Showing posts with label 2019. Show all posts

January 31, 2023

Neitherlands Quilt


In 2019, my mom and I attended QuiltCon in Nashville and took the Mystery Quilt Workshop with Jen Carlton Bailly (aka @bettycrockerass). We got copies of two of Jen's new patterns at the time, Find Your Fade and Neitherlands, a big set of curvy templates in various sizes, and the choice of patterns to work on in the workshop. We both decided to make a Neitherlands block, and I finished one during our time with Jen. I made one more block when I returned home, but then I packed the project away and put it on a shelf ... until last fall. I pulled the project box out again, grabbed some fabric, miscut that fabric as I knew I would (the templates and pattern are a little tricky to sort out when you haven't worked on it in a while) and then found my groove.


I had a lot of fun raiding my fabric stash to find prints that would work together and still provide the contrast necessary to get the full visual effect of the curved piecing. The dark centers are Peppered Cottons, which are yarn-dyed shot cottons, so they're not quite gray and not quite black.


The three blocks that make up this pattern all have different curves, so I got a lot of practice. I love cutting curved templates, but sewing them up can be tedious, so I had to tackle these in batches. I loved the results, though, so that helped motivate me to get each block assembled.


At almost 60x60 inches, this quilt was too big for me to want to quilt on my own, so I took it to my favorite local longarmer. I don't plan to keep this quilt for myself, so I was willing to try a pantograph that's a little wilder and more unusual than what I'm usually drawn to. This is Time Warp by Urban Elementz, and I love how the quilting curves play with the pieced curves, and the lines give the quilt amazing texture.


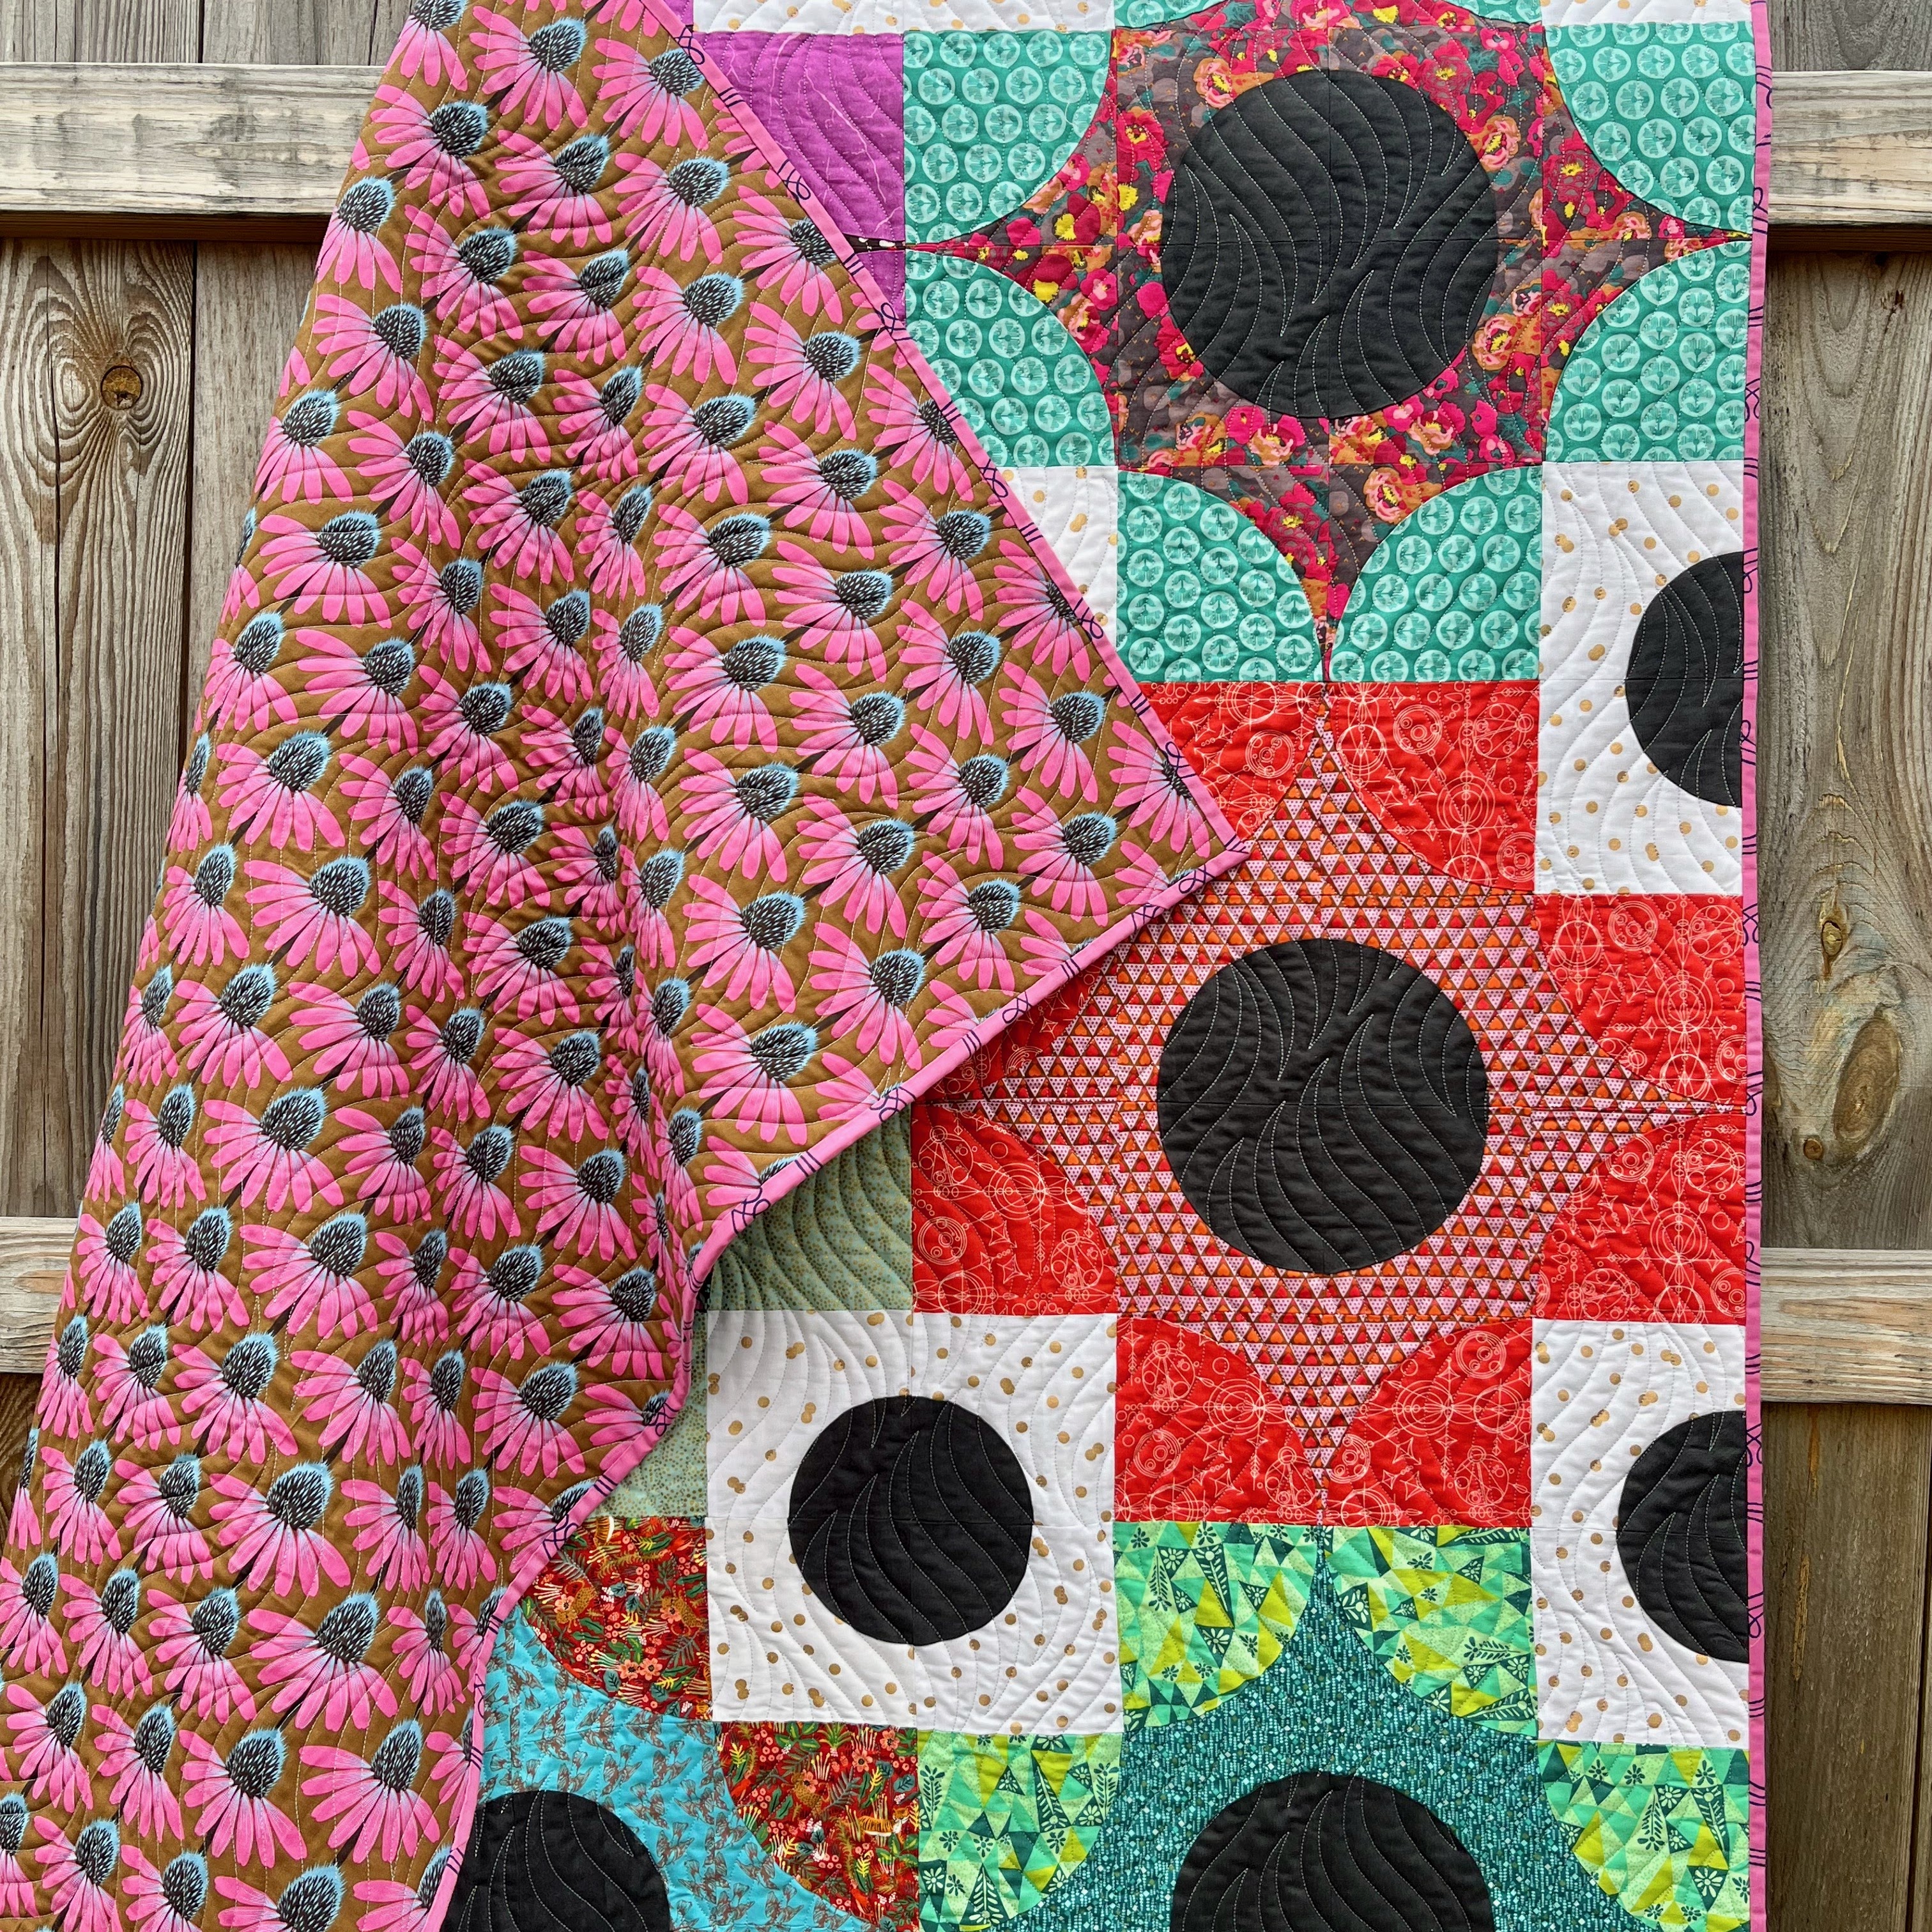
The backing, one of Anna Maria Horner's Echinacea prints, was destashed by a guild friend of mine, and I thought it was just perfect for this quilt that's already a riot of color and print. I did some print matching along the back seam, and it turned out really well. I couldn't decide what to use for binding until I found this pink print in my stash. The lines running across it have made it difficult for me to use in other projects, so I guess it was meant to be binding!


November 27, 2020

Round and Round Mini Quilt


Every time I make a mini quilt, I think, "I should really make more of these." They're a relatively fast and easy way to try a new pattern or technique and get a satisfying finish on the books. Or in the blog.

My quilting guild, the Knoxville Modern Quilt Guild, organizes a brown bag holiday gift swap at the end of each year, coinciding with our December holiday party. Around October, participants bring a supply of fabric and a note about what they'd like to receive and we put them in unmarked brown paper bags. Anyone who brings a bag gets to take one home -- randomly -- and make a gift for that person using the fabric and information inside.

For the 2019 swap, I drew my mom's bag. Totally randomly. Didn't plan it at all. I had to laugh because it made the project more fun but also way more challenging because I couldn't discuss anything with her or else she'd know something was up. I didn't want to risk blowing the surprise, so I didn't bring up the challenge in the weeks between the bag swap and the final reveal, and anytime she mentioned it I tried to be brief and vague. I don't think she caught on.

My mom's brown bag contained cool-colored fat quarters and "surprise me!" instructions. So I thumbed through my books and patterns and Pinterest board looking for ideas for something she might like. I finally decided on a pattern I bought years ago, Round and Round by Thimble Blossoms -- I like the design and have always wanted to make it but just have never found the time. Even better is the fact that this pattern includes instructions for a mini quilt! Just one block - it was meant to be!

I added a couple of fabrics to my mom's selection, including a slightly heathery Cloud9 background neutral that I love. It came together really quickly, and I decided to make it more personal with some big stitch hand quilting. I chose perle cotton in multiple colors that coordinated with the quilt piecing and just ran some lines across it here and there, trying not to distract too much from the overall design.

Now it's hanging in my mom's house and I get to see it every time I stop by.


February 2, 2020

Spring Thaw Quilt

One of the first activities my quilt guild (Knoxville Modern Quilt Guild) does every year is set quilting/sewing/creative goals. We pull them out at our holiday party in December to see how well we did and how much we accomplished. One of my goals this year is to blog at least once a month. I missed January -- great start! -- but I've decided to just double up in February to make up for it. I have a bunch of finished quilts and other projects that I haven't shared here, so I should have enough content to make it through the rest of the year. Even if a lot of people don't see these posts, I like having the record of what I've made.


Every year, I set a goal of making more quilts and things from the books and magazines I've collected. This pattern, called Spring Thaw, was designed by Jodi Nelson and appears in the March/April 2015 issue of Quilty magazine.


I started this quilt in 2018, but years before, I won a fat quarter bundle of Sweetwater "Noteworthy" fabric from an online fabric shop. It turns out that 42 fat quarters go a loooooong way, and this is the second pretty large quilt I've made using that bundle. AND I still have some fabric left that could become yet another quilt. Here's the first one, made using a quilt-as-you-go method and donated to Project Linus for a teen in need:


I started out making a twin-size quilt like the one in the pattern, but when it was on my design wall and the bottom rows were cascading down onto the floor, I started to wonder why I was making it so large. So I removed some rows and columns and it finished around 51 x 64. I found the rose-colored backing fabric on the clearance shelves of a local quilt shop, and the longarm quilting was done by local quilter Pat Pike. Since I didn't have a plan for this quilt -- it wasn't made for anyone in particular or for me to keep -- I decided to see how aqua quilting thread turned out. I like it a lot -- it's playful and a good fit for the overall design.


I started this back in 2018 and finished it in 2019 -- feels great to finally have it done! Now it just needs a home... Quilt for sale! Quilt for sale!

December 15, 2019

Wonky Pound Sign/Hashtag Block


Whether you call it a pound sign, hashtag, nine-patch, tic-tac-toe or something else, this grid block is an easy one to make. The following instructions are for members of the Knoxville Modern Quilt Guild, as this block is being collected for our next charity quilt, but anyone is free to make it!

KMQG:
Please use this color palette -- solid fabrics and white. You can make the strips white, as I've done here, or reverse the color placement so that the background is white and the strips are one color.

Blocks are due by the meeting on February 15, 2020. Email modknoxville@gmail.com with questions!

The unfinished block should be 13.5 to 14 inches. Do not trim the block to size. Just turn it in as it is, and the volunteer who pieces the top can trim all blocks to a consistent size.


STEPS:

1. Start with a square at least 12.5" and four strips 1.5 x 15."

2. Use a ruler to cut the square into thirds. The cuts can be slightly slanted, but if you're more comfortable with precise, straight lines, feel free to do that instead. (Tip: I tried this block without using a ruler, and it made the strips harder to piece. So grab that ruler and rotary cutter.)


3. Insert two strips into the cuts, and piece the square back together. Press the seams open. With wonky lines, it's a little tricky to get the outside edges of the square aligned again, so take care and do your best. Remember that the block will be oversized, so it's okay if the edges are a little bit off (like mine are!).


4. Use a ruler to cut the square into thirds again, perpendicular to the first two strips. (Again, if you're more comfortable with precise lines, you don't have to make them wonky.)


5. Insert the remaining two strips into the two cuts. Pin and sew them to two sections. Press the seams open.


6. Now you need to sew the three sections back together. If your strips are precise, line up the strip seams on both sections, pin and sew. Press the seams open.

If your strips are wonky, this is the trickiest part of the block because the seams don't line up exactly across the break. Lay the two sections together and eyeball the alignment of the vertical strip so that it doesn't appear to shift to the right or left as it's intersected by the horizontal strip.
Then carefully flip them right sides together (I flip the lower section up so that it's on top). Try to do this flip without shifting the piece to the right or left. Pin to avoid shifting while sewing.


In the photo below, you can see that the vertical seams look pretty well-aligned on either side of the horizontal strip. Check your piece to see if they look aligned before you start sewing. You can also experiment with putting a pin in one seam and trying to line it up with the other seam. Or if you have a trick for getting this part right, let me know!


Sew two sections together, and press the seam open. Then repeat the alignment with the third section. Flip, pin, sew and press the seam open.


7. And there you go! Your block is ready to be trimmed to size (or not, if this is for the KMQG charity quilt).

October 17, 2019

Quilty Hearts Quilt


A lot of quilters who design patterns also organize quiltalongs for the pattern release. It's a period of weeks or months when quilters are encouraged to buy the pattern and join the fun, making the quilt at the same time and posting their progress on social media. There are usually benchmark goals and prizes involved. A couple times a year, I get sucked into this excitement. Sometimes I talk myself out of it, but sometimes I join in, knowing from the start that I won't be able to keep up with the pace. I guess I'm not technically quilting along when I'm actually working at my own speed and making the quilt in my own time, but it's the idea that counts. And the quiltalong motivates me to start the project even though I'm always so far behind that I'm not eligible for any prizes.


This year, the pattern that got me was Quilty Hearts by Emily Dennis of Quilty Love. What do I like about this quilt? It's block-based, set on point, and scrappy. It's also easy to cut and assemble, so it was a good project to work on a little bit here and there whenever I had time (evenings and weekends).


Initially, I thought that I might give this one to someone in my family, but when it came time to choose the backing fabric, I struggled to find something that would work with their home. So I decided not to force it and changed my plan -- I gifted this quilt to my friend Jessica and her family. They have pops of color in their living room that I thought would make it the perfect home for the quilt.


The fabrics in the hearts have a lot of memories attached to them. Some of them were used in the two quilts I made for Jessica's daughters. Others appeared in quilts for my nieces, clothing I made for myself, dresses that my mom made for my nieces, and gifts I've given to friends and family. The thing I love about scrappy quilts is that they remind me of everything I've made -- I can remember where each fabric was used before.


Being twin size, this quilt needed to be longarmed, so I sent it off to my fellow Knoxville Modern Quilt Guild member Pat. The scalloped quilting adds some soft curves to this otherwise sharp and blocky design. The binding is the same fabric as the backing.


This quilt was a lot of fun to make, and I'm pretty proud that I managed to both start and finish it within the same year!

LinkWithin

Related Posts Plugin for WordPress, Blogger...