Showing posts with label Decorating. Show all posts

October 28, 2022

Good Morning Sunshine Pillow


Earlier this year I converted my guest room into a full-time home office, replacing a bed that took up most of the room with an olive green velvet sleeper sofa from Edloe Finch. (The back lays down like a futon, but it looks much more like a regular sofa than the typical futon. It's firm but comfortable.) After months of it looking pretty bare, I decided to start making toss pillows for the sofa. For the first one, I used a template from the Good Morning Sunshine free quilt pattern from Heather Ross and Windham Fabrics:


I resized one sunburst template to fit a rectangle down pillow insert that I already had on hand. The toughest part was figuring out the rays -- what colors to use and in what order. I decided on a neutral background with the cutest tiny rainbows on it (from this bundle that I picked up at local Mountain Creek Quilt Shop) and a collection of solid raspberry, pink and coral scrap strips. The mustard yellow sun is also a scrap.


For the back, I pulled out a fat quarter of Tula Pink lady bugs that couldn't be a more perfect color match. I'm not sure how I got so lucky, but it pays to have a fabric stash! I also decided to put a zipper in the bottom seam in case I ever want to remove and change or wash the cover. I used this tutorial from Wren Collective and it worked like a dream.


I'm really happy with how this pillow turned out, and it looks so nice on the sofa every time I enter my home office. Now I'm brainstorming other pillows to add and considering a knitted or crocheted one to add some texture. I'm sure there will be more quilted pillows, too!

June 29, 2018

My Master Bathroom Renovation

Before (yuck)

My 3-bedroom, 2 bathroom condo was built in 2000, and when I bought it and moved in back in the fall of 2015, I knew immediately that I'd eventually want/need to make some changes to the master bathroom. At some point during its life, previous owners gave this bathroom a few updates. I think someone removed a bathtub/shower combo and put in a vinyl shower insert, the toilet was replaced, and an appallingly large 3-section medicine cabinet was put up. After the first few nights of bonking my head on the cabinet every time I bent down to brush my teeth or wash my face, I knew it would have to go. But not right away. It wasn't until the plastic and rubber parts of the original builder-grade faucets started to disintegrate that I decided to make a change. So really, this all started with faucets. IT ALL STARTED WITH FAUCETS.

My dad, the tile-demo expert

I wanted to replace the faucets, but I didn't really want to just replace them with new low-spout faucets that would fit under the stupid medicine cabinet, so I started thinking about higher spouts, which led me to look at widespread faucets instead of center-set. And that led me to consider a new countertop and sinks. At that point I was leaning toward keeping the cabinet and having it painted. But I really despised the pinkish-tan floor tiles that looked very dated to me and hadn't held up all that well in the last 17 years. When I discovered that the pinkish tiles ran under the cabinet, the project got a whole lot bigger.

This is when I realized a plumber needed to cut and cap all the supply and drain lines before I could remove the old cabinets. Unexpected expense!

So where did I end up? New floor tile, cabinet, countertop, sinks, faucets, mirrors, light fixtures, cabinet hardware, wall paint, baseboards and shoe molding, and switchplate covers just for the heck of it. The only things I haven't changed are the towel bars (which I bought last year), toilet (replaced by previous owners and totally fine), and shower. My long-term plan is to remove the shower insert and have it all tiled and new frameless doors installed. For now, it's totally acceptable -- and it's tucked back into the corner of the bathroom, so it's easy to ignore. It just wasn't in my budget right now, and I couldn't handle making any more choices and arranging the work.


After demo, the first new thing to go in was the tile floor. My vision from the start was to make the room bright, crisp, and clean. I considered large porcelain tiles, but the small mosaic design had been in my mind the whole time, and I ended up going with white and gray octagon-and-dot tiles. These came from Lowe's, but I saw the same tile available in a few other stores. I chose white grout and was assured that this particular grout is high-quality and repels dirt and staining. Fingers crossed!


I kept my cat Frannie out of the room while there was exposed concrete and pipes, so she was surprised by the feel of the mosaic tile on her paws when I finally let her back in. The new Shaker-style gray cabinet is Waypoint in Stone. I chose gray versus a white cabinet so that it would provide more contrast with the tile floor. And with a light countertop, I think it all works well together. The cabinet hardware is Kohler. I worked with a local kitchen and bath store for the cabinet, countertop, and sinks. I found the chrome hardware at another design/plumbing supply shop in town.


This photo is the best representation of the light and how everything looks in the room. The countertop is Viatera Minuet quartz, and I chose white rectangular under-mount sinks. Initially, I thought I wanted a more subtle white quartz with little to no veining. But when I saw the large display slab on the wall at the stone shop and held a cabinet door up to it, I really liked the look of this one. My mom and I agreed that the veining was interesting but not overpowering and a good complement to the cabinet and tile.


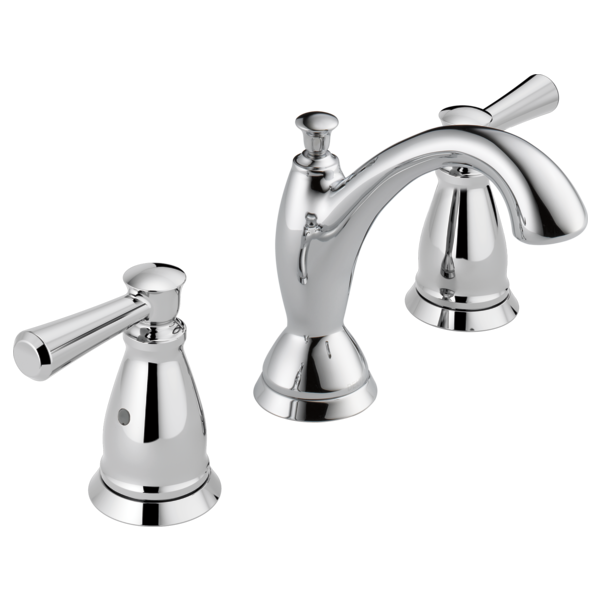
This whole project started with the need for new faucets, and these were so hard to choose! I looked at every faucet I could find, at every plumbing supply store in town, and I still wasn't thrilled with my choices. I couldn't find anything that was just right, and I finally settled on this Delta Linden widespread faucet. The spout was fine, but I didn't love the handles that I saw in the store -- and then I realized that there was a different handle design option available. I greatly preferred the handle you see above, so all in all, I'm happy with these faucets.


The rectangular mirrors with a beveled frame are from Lowe's. The mirror size and shape was another difficult decision (pivoting? framed? oval? rectangular?), but these turned out to be perfect. The round rugs with a little crocheted edge detail are from World Market (and they come in a variety of colors).


And finally, these aren't the greatest photos, but new light fixtures made such a difference in the space. The vanity fixture is from a local lighting store and is actually the first thing I bought for the renovation. I despised the curvy fixture it replaced and couldn't wait to see it go. The flushmount on the ceiling is the second one I tried. The first one was an LED that looked too much like an oversized tap light to me. So I tried this Pottery Barn Hayden Flushmount in satin nickel finish, and it's perfect.

One last thing -- the wall color is Sterling White by Sherwin Williams. It's a pale gray -- definitely more sterling than white -- complements the grays in the tile and cabinet but is still bright enough to bring lightness to the room.

June 2, 2016

Baking Cup Wreath


If you're looking for a craft project, or if you want to make a wreath for your spring or summer decor, look no further. My job requires me to watch a lot of videos and navigate some pretty popular websites, and when I came across this wreath tutorial, I knew I had to try it: http://www.hgtv.com/design/make-and-celebrate/handmade/baking-cup-wreath.


I bought a few wreath forms and used lots of coupons to pick up baking cups in a variety of colors from my local craft store.

I saw these at a craft store AFTER I bought mine -- this is a much better deal, especially with a coupon, so shop around!

My mom came over, and we fired up the hot glue guns. Here are a few notes:
  • The online instructions don't explicitly tell you to flip the baking cups inside out before gluing one inside the other, but you should flip them. You can infer it from the photos, or just trust me. And you can flip a whole stack at once when they're still nestled inside each other from the package, then separate them out to start gluing.
  • If you're doing this project by yourself, I suggest that you glue lots of cups together, and then spend time crinkling them all up into flowers. That way when you finally get to glue them on the wreath form, you can do just that without stopping to make more. Or, even better, get a buddy to make a wreath with you and you'll get to the fun part -- gluing paper flowers on the wreath -- even faster.
  • You can make one-color blossoms or mix two colors. I made and used only one-color flowers, but my mom mixed some baking cups together and used two-color blossoms in her wreath for a different look.
  • The tutorial says to put glue on the wreath and then put the flower in place, but the photo shows the glue being applied to the flower -- do it that way. It's much easier to get the flower where you want it when it has the glue on it. Also, hold each flower in place for a few seconds to let the glue set slightly before you move on to the next flower.
  • I found it easiest to start at the top of the wreath and work my way around, covering the form as I went as opposed to scattering flowers and then trying to fill in the gaps. When I got back to the top, I left a gap and added a hanging ribbon with a little glue; then I filled in the space with the last of the flowers.


I liked the whiteness with pops of color in the inspiration wreath, so I started on the one below, made it about halfway around, and had to get more white baking cups. If you want to do one dominant color, buy twice or even three times the number of cups. You can always use extras for, you know, cupcakes and muffins.


My mom came up with her own variation: a cluster of flowers on one side and coordinating ribbons on the rest of the wreath. I like the lighter look, and the ribbons really brighten it up.


I gave my first all-color wreath to a friend for her birthday, and then I made another one as a Mother's Day gift for my sister. The yellow pops off her red door nicely. This would be a great project to feature team or school colors, fall colors, or red, white, and green for the holidays.

April 24, 2014

Easiest Easter Wreath Ever

Pin-spiration strikes again!  The simplicity of a Pinterest find led me to create a new Easter/spring wreath for my front door.  It might be because I have so much going on with my new planters that keeping the wreath simple was so appealing.

Pin-spiration Source: Maddy Jane Designs
Source: InspireMeGrey


I started looking around to create a version of my own, and here's what I found:

Materials:

  • A boxwood wreath: I found one at Target by Smith and Hawken that was more than I wanted to pay, but after shopping around at several craft stores (Joann, Hobby Lobby), I figured that what I was saving on the wreath I was spending on gas.  So I just bought the one at Target.
  • Ribbon: The burlap ribbon was half-off at Hobby Lobby. Keep an eye out because there are often great ribbon sales, but they typically hit during the week and end before the weekend begins. Tricky!
  • Fuzzy bunny: Did you know the best place to find these is eBay? Most run between $6-10 and are perfect for the width of the narrow wreath. I first purchased a fabric-covered bunny at Hobby Lobby, but it's base was too big for the wreath, so it will end up in some sort of Easter centerpiece next year instead.

Steps:


1.  Create a burlap loop around the top of the wreath, and hot glue the ribbon to itself. My wreath already had a substantial hanging loop on the back; if yours does too, just make sure you don't cover that up -- you'll need it. To cover my brassy door hanger, I used small dots of hot glue to secure the burlap ribbon to the hanger. I made a bow out of the ribbon and used more glue to attach it to the covered door hanger.


Source: InspireMeGrey

2.  Secure the bunny to the wreath. You could use hot glue to hold your bunny in place, but I chose not to do so on my natural boxwood wreath. Instead I positioned my bunny on the wreath and then used some double stick tape to attach the bunny's side to the door. It's still in place after opening and closing the door regularly, so it's a good temporary option.

Source: InspireMeGrey


April 3, 2014

Woodland Baby Shower


My new niece or nephew was due this past Monday, and she/he seems to wish to make a grand, fashionably late entrance into the world.  So I figure it's as good a time as any to share the baby shower that Jen and I hosted for our sister Emily after Christmas, when we were all still in town together.  (My immediate family is spread out across 4 states, so we have to cram a lot into the limited times when we're all together.)

The baby's room is decorated with a woodland theme (see this post), and we decided to use the same theme for the shower.  I was in charge of invites, and I picked up some funky owl note cards at Target to turn into invitations, but then I found these baby fox invitations from Classicology on Etsy.  I checked with Jen and Mom and they agreed that the foxes were in and the owls were out.

Jen and I pinned a lot of woodland party and baby shower ideas, and in the end, some things we used and some we didn't.  There are so many over-the-top party designs to drool over online, but when it comes down to it, you can only do so much.  People will appreciate any effort you make, and no one will ever know about the dozen other things you pinned and never made (like the burlap bunting that I even bought supplies for...).

Here are a few of our woodland decorations:

I cut the tops off of these bookmarks and glued them to skewers for little tuck-ins for the flower arrangements.

http://www.elli.com/blog/printable-woodland-friends-bookmarks/
For the favors, I made little acorns with half mini Nutter-Butter cookies, chocolate Kisses, butterscotch chips, and chocolate frosting.  More free printables decorated each treat bag.


Jen decorated the food table with a wide burlap runner, a large vase, and dried flowers.  The vase and flowers were already on her table, and to enhance the woodland feel, she wandered to the woods nearby and clipped some twigs to tuck into the arrangement along with the little bookmark skewer guys.  We were excited to discover that the vase fit perfectly in a woodsy drawstring toy bag I made for Jen's daughter for Christmas a while back.


Our mom and her friend assembled an awesome diaper cake (spiraling the diapers instead of rolling each one makes it super classy).  We wrapped each layer with ribbon and tucked in a variety of woodland animal ornaments and stuffed critters.  Mommy-to-be Emily crocheted the owl at the top.


I brought some of the quilt blocks that I was making for a quilt for the baby's room and we hung them across the doorway as a banner.


October 24, 2013

DIY Monogrammed Fall Wreath

I bring you another Pinterest success story just in time for fall decorating, and if you do it right, you can swap many of the elements out for a Christmas version (more to come on that one).

Here's the Pinspiration from the wonderful Etsy store theembellishedhome where it was sold out:

Photo copyright theembellishedhome

Here's my version:


I was able to get all of the materials at my local Hobby Lobby, which made it easy to shop and assemble the wreath all in one weekend. Total cost of the materials ran about $50; if you make one with a friend, you could easily save $10-15 by using coupons and sharing the decorative ribbon. If I had been focused, I think I could have completed my wreath in two hours, but Surviorman was on TV that night and I kept getting distracted by how he was able to keep a fire burning through a thunderstorm.  You know how it is.

Materials

  • Wreath frame (20-inch diameter)
  • Floral wire or pipe cleaners
  • Wire cutters
  • 3-4 hydrangea blossoms
  • 2 bundles of plain burlap ribbon, each 8 inches wide by 15 feet long (If you purchase narrower burlap, expect to use 3 to 4 rolls.)
  • 2 rolls of decorative burlap ribbon (1 solid, 1 print)
  • 12-inch letter
  • Hot glue gun


Step 1
Attach the burlap ribbon to the cross piece of the wire wreath frame. I found that "basting" the ribbon with a piece of the floral wire (about 4 inches long) then wrapping the wire around the wreath frame with a few twists secured the ribbon easily.


Step 2
Create a loop and attach the burlap to the next wire in on the wreath frame. A couple of things to note: This is not a science, and your loops don't have to be perfect. Just work your way up and down the wreath frame, shoving the loops together and adding more. It takes a while to work around the wreath, but you'll use both rolls of burlap.


Step 3
When you've made it all the way around with the burlap it will look something like this. Notice the "bare" spot in the top right (2 o'clock) where you'll attach the bow.


Step 4
Time to make the bows. Make four loops out of your solid burlap ribbon and tie them together with floral wire that is 7-8 inches long (don't cut off the excess wire).


Step 5
Make another four-loop bow slightly smaller than the solid bow. Use the wire on the solid bow to create the knot.


Step 6
Use the floral wire to attach the stacked accent bow to the wreath base, and then adjust it until you like how it appears. You may also need to adjust the burlap below it so that the ribbon lays properly.


Step 7
Use your wire cutters to remove the leaves from the floral stems. Cut the blossoms off the floral stems, leaving just 1 inch of stem on the blossom. This is enough to secure to the burlap with hot glue.


Step 8
Keep the wire cutters out. Flip the wreath over and wind the wire ends from the burlap back up into the wreath. Trim the ends were necessary. They key here is to make sure you can run your hand along the back of the wreath without being scratched. Adjust any rough spots so you don't damage your door.

Step 9
Attach the flowers with minimal hot glue if you want to be able to swap out the colors with the seasons. Wire the letter to the wreath. I also added a few hot glue dots here and there because I didn't want the letter to shift. My floral wire was green, so i hit it with a Sharpie marker and a decorative gold marker to mimic the detail on the letter. You can't tell unless you're up close to the letter, which is fine -- it's a wreath, people!


September 14, 2013

Craft Book Month: Pillow Pop


Hi everyone!  September is Craft Book Month over at Craft Buds, and the 3rd annual celebration has been a blast so far. The idea behind Craft Book Month is to dust off some of those craft books you've collected and actually make something from them (I know, what a novel concept!). I've been following along with all the wonderful bloggers who have posted about their books and projects, and I'm happy to join the party again this year. (You can find all the blogger links at the end of this post, so you can admire their handiwork as well and maybe get inspired to pick up a new book or two.)

This year I decided to request a bunch of craft books from the library and see what jumped out at me. I picked books that I've been seeing and reading a lot about in sewing and quilting circles online, and I was not disappointed! I found a bunch of projects that I'd like to try, and in the end I chose a pillow pattern from Pillow Pop: 25 Quick-Sew Projects to Brighten Your Space by Heather Bostic. The book is a compilation of pillow patterns/projects from a variety of contributors, so a lot of different styles and techniques are represented.


In true indecisive-crafter fashion, I snapped photos of my 4 favorite projects and sent them to my mom so that she could help me decide which one to make. Lucky enough, her first choice was my first choice too! These were my faves --


I made the first one, the Jewel of the Sea, which appears on the cover of the book.  I used Madrona Road fabric that I had on hand from the Modern Quilt Guild challenge that I participated in earlier this year (when I made this quilt). I've kept that quilt to use in my guest room, so a matching pillow just made sense.

IMG_2286

The shattered design looks complicated, but it's simple string blocks that you then slice into 4 smaller blocks. (3 inches! So cute!) A little mixing and switching around, and the center of the pillow is done.

Madrona Road pillow

Madrona Road pillow

Madrona Road pillow

I added yellow and white borders to keep the front light and bright.  The backing is a Silent Cinema print that's a nice shade between gray and blue.

Madrona Road pillow

Madrona Road pillow (and Jack)

I'm really happy with this pillow and think it looks pretty spiffy on my guest bed (the cat likes it too).  I recommend the book Pillow Pop for all the variety it offers -- I still have 3 more favorite pillows to make!

Craft Book Month

It's the 3rd Annual Craft Book Month at Craft Buds! This year, we're excited to celebrate all month log with a blog hop of your inspirational craft book projects, a crafty contest, free patterns and prizes!

Don't let those craft books sit on your shelf and collect dust! We want to see what you've been making. That's why I've teamed up with some fabulous bloggers who will be showing off their projects made from craft books, all month long!

Blog Hop

Week One

Monday 9/2: Fabric Mutt / LRstitched
Tuesday 9/3: Stitch This! The Martingale Blog / Stitched in Color
Wednesday 9/4: Fabric Seeds / Pile O Fabric
Thursday 9/5: The Feisty Redhead / Rae Gun Ramblings
Friday 9/6: Sew-Fantastic / Clover + Violet
Saturday 9/7: A Prairie Sunrise / Small Town Stitcher

Week Two

Monday 9/9: Hopeful Threads / Go To Sew
Tuesday 9/10: The Sewing Rabbit / Sewing Mama RaeAnna
Wednesday 9/11: Marci Girl Designs / imagine gnats
Thursday 9/12: Sew Sweetness / amylouwhosews
Friday 9/13: Lindsay Sews / 13 Spools
Saturday 9/14: Inspire Me Grey / Angela Yosten 

Week Three
Monday 9/16: Sew Very / Craftside
Tuesday 9/17: The Littlest Thistle / CraftFoxes

9/1-9/30: Link up your craft book project at Craft Buds from your blog or Flickr account, and enter to win prizes. Winners will be announced on Tuesday, October, 1!


2012 Craft Book Month Projects (L to R):

Sew Crafty Jess, Sewing Rabbit, Stitched in Color, MissKnitta's Studio

To participate in the month-long contest, just link up any project you've made from a pattern in a craft book. That easy! You'll tell us a little about the book, the project, how you personalized it, etc.

Rules

1) One entry per person. 

2) Your craft book project must have been completed in 2013. 

3) Create a new blog post or Flickr photo (dated September 1, 2013 or later) and link back to Craft Buds/Craft Book Month in your post or photo description. In your post or photo description, make sure to list the craft book you used and provide a link if possible.

4) All winners chosen via Random.org. Some prizes available to international winners, so please join us!

Prizes

Visit Craft Buds and link up your craft book project during the window of Sept 1-30 and you'll automatically be entered to win some fantastic prizes from the Craft Book Month sponsors!

No time to make a project? You can also follow Craft Buds all month long for your chance to comment and win some new sewing and quilting books for your library.


 Craft Book Month at Craft Buds

LinkWithin

Related Posts Plugin for WordPress, Blogger...