Showing posts with label Wreath. Show all posts

June 2, 2016

Baking Cup Wreath


If you're looking for a craft project, or if you want to make a wreath for your spring or summer decor, look no further. My job requires me to watch a lot of videos and navigate some pretty popular websites, and when I came across this wreath tutorial, I knew I had to try it: http://www.hgtv.com/design/make-and-celebrate/handmade/baking-cup-wreath.


I bought a few wreath forms and used lots of coupons to pick up baking cups in a variety of colors from my local craft store.

I saw these at a craft store AFTER I bought mine -- this is a much better deal, especially with a coupon, so shop around!

My mom came over, and we fired up the hot glue guns. Here are a few notes:
  • The online instructions don't explicitly tell you to flip the baking cups inside out before gluing one inside the other, but you should flip them. You can infer it from the photos, or just trust me. And you can flip a whole stack at once when they're still nestled inside each other from the package, then separate them out to start gluing.
  • If you're doing this project by yourself, I suggest that you glue lots of cups together, and then spend time crinkling them all up into flowers. That way when you finally get to glue them on the wreath form, you can do just that without stopping to make more. Or, even better, get a buddy to make a wreath with you and you'll get to the fun part -- gluing paper flowers on the wreath -- even faster.
  • You can make one-color blossoms or mix two colors. I made and used only one-color flowers, but my mom mixed some baking cups together and used two-color blossoms in her wreath for a different look.
  • The tutorial says to put glue on the wreath and then put the flower in place, but the photo shows the glue being applied to the flower -- do it that way. It's much easier to get the flower where you want it when it has the glue on it. Also, hold each flower in place for a few seconds to let the glue set slightly before you move on to the next flower.
  • I found it easiest to start at the top of the wreath and work my way around, covering the form as I went as opposed to scattering flowers and then trying to fill in the gaps. When I got back to the top, I left a gap and added a hanging ribbon with a little glue; then I filled in the space with the last of the flowers.


I liked the whiteness with pops of color in the inspiration wreath, so I started on the one below, made it about halfway around, and had to get more white baking cups. If you want to do one dominant color, buy twice or even three times the number of cups. You can always use extras for, you know, cupcakes and muffins.


My mom came up with her own variation: a cluster of flowers on one side and coordinating ribbons on the rest of the wreath. I like the lighter look, and the ribbons really brighten it up.


I gave my first all-color wreath to a friend for her birthday, and then I made another one as a Mother's Day gift for my sister. The yellow pops off her red door nicely. This would be a great project to feature team or school colors, fall colors, or red, white, and green for the holidays.

December 1, 2014

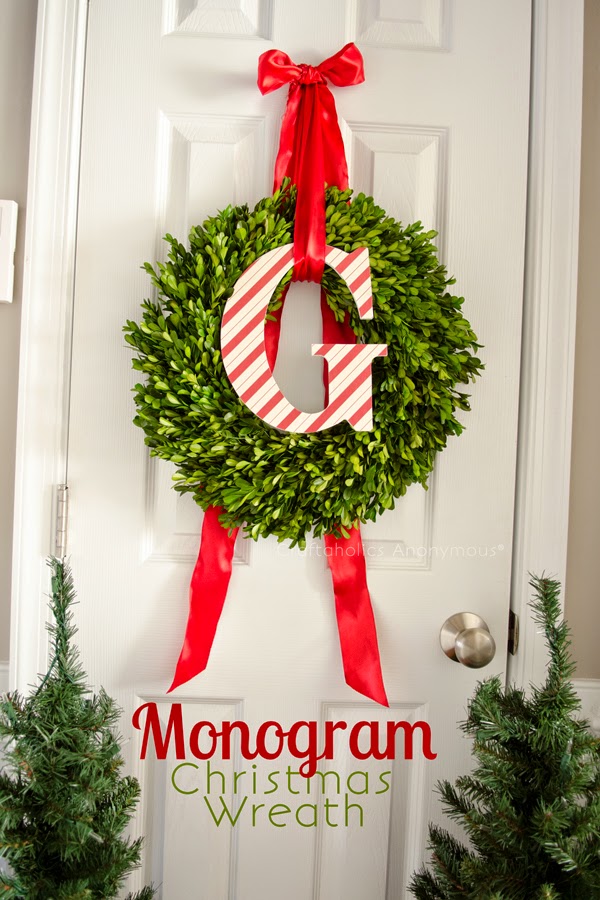
2014 Holiday Wreath: Candy Cane Monogram


Ta-DA! Here is my 2014 Christmas wreath that ran me a whole $5 this year because many of the materials came out of storage bins in my basement. The wooden "G" was a Joann's purchase along with a little bottle of white acrylic paint and a red paint pen. The wreath, ribbon, and clip-on poinsettia were all Christmas leftovers.

Looking to recycle an old wreath into something new to dress up your door? Follow these simple steps:
  1. Remove adornments from an existing wreath (or pick up a new plain wreath if you don't have an old one to recycle). My old wreath had some gold jingle bells and some plaid ribbon wrapped around it, and it didn't even come out with the rest of my decorations last year, so it was primed for a comeback.
  2. Select 3-4 yards of wired ribbon. I was able to find a spool of ribbon in the depths of my holiday decor stash, but if you have to buy it new, it should cost around $3-$6 on sale (and this time of year, practically everything is on sale).
  3. Purchase a wooden letter and paint it white. I applied two coats to make it opaque. Don't waste any time sanding the letter before you paint it unless your letter could cause splinters or prohibit you from drawing straight lines across it easily.
  4. After the white paint is dry, use a ruler and pencil to draw diagonal lines across the letter every 1/2 inch.
  5. Use a red paint pen to create the candy cane effect, drawing over and filling in between your lines as pictured.


I used a length of ribbon to tie the "G" to the wreath and then hid it with a poinsettia-topped bow. The lengths of ribbon behind the wreath are simply looped onto the wreath hanger and draped behind the wreath for a little sparkle.

Pinterest is the best place to find wreath inspiration. Below is the original from Craftaholics Anonymous. Instead of decoupage, I painted. And instead of purchasing a new boxwood wreath, I recycled some faux greenery. The end result is essentially the same, and it cost a lot less, which makes it a hands-down winner in my book.

http://www.craftaholicsanonymous.net/monogram-christmas-wreath-tutorial

April 24, 2014

Easiest Easter Wreath Ever

Pin-spiration strikes again!  The simplicity of a Pinterest find led me to create a new Easter/spring wreath for my front door.  It might be because I have so much going on with my new planters that keeping the wreath simple was so appealing.

Pin-spiration Source: Maddy Jane Designs
Source: InspireMeGrey


I started looking around to create a version of my own, and here's what I found:

Materials:

  • A boxwood wreath: I found one at Target by Smith and Hawken that was more than I wanted to pay, but after shopping around at several craft stores (Joann, Hobby Lobby), I figured that what I was saving on the wreath I was spending on gas.  So I just bought the one at Target.
  • Ribbon: The burlap ribbon was half-off at Hobby Lobby. Keep an eye out because there are often great ribbon sales, but they typically hit during the week and end before the weekend begins. Tricky!
  • Fuzzy bunny: Did you know the best place to find these is eBay? Most run between $6-10 and are perfect for the width of the narrow wreath. I first purchased a fabric-covered bunny at Hobby Lobby, but it's base was too big for the wreath, so it will end up in some sort of Easter centerpiece next year instead.

Steps:


1.  Create a burlap loop around the top of the wreath, and hot glue the ribbon to itself. My wreath already had a substantial hanging loop on the back; if yours does too, just make sure you don't cover that up -- you'll need it. To cover my brassy door hanger, I used small dots of hot glue to secure the burlap ribbon to the hanger. I made a bow out of the ribbon and used more glue to attach it to the covered door hanger.


Source: InspireMeGrey

2.  Secure the bunny to the wreath. You could use hot glue to hold your bunny in place, but I chose not to do so on my natural boxwood wreath. Instead I positioned my bunny on the wreath and then used some double stick tape to attach the bunny's side to the door. It's still in place after opening and closing the door regularly, so it's a good temporary option.

Source: InspireMeGrey


October 24, 2013

DIY Monogrammed Fall Wreath

I bring you another Pinterest success story just in time for fall decorating, and if you do it right, you can swap many of the elements out for a Christmas version (more to come on that one).

Here's the Pinspiration from the wonderful Etsy store theembellishedhome where it was sold out:

Photo copyright theembellishedhome

Here's my version:


I was able to get all of the materials at my local Hobby Lobby, which made it easy to shop and assemble the wreath all in one weekend. Total cost of the materials ran about $50; if you make one with a friend, you could easily save $10-15 by using coupons and sharing the decorative ribbon. If I had been focused, I think I could have completed my wreath in two hours, but Surviorman was on TV that night and I kept getting distracted by how he was able to keep a fire burning through a thunderstorm.  You know how it is.

Materials

  • Wreath frame (20-inch diameter)
  • Floral wire or pipe cleaners
  • Wire cutters
  • 3-4 hydrangea blossoms
  • 2 bundles of plain burlap ribbon, each 8 inches wide by 15 feet long (If you purchase narrower burlap, expect to use 3 to 4 rolls.)
  • 2 rolls of decorative burlap ribbon (1 solid, 1 print)
  • 12-inch letter
  • Hot glue gun


Step 1
Attach the burlap ribbon to the cross piece of the wire wreath frame. I found that "basting" the ribbon with a piece of the floral wire (about 4 inches long) then wrapping the wire around the wreath frame with a few twists secured the ribbon easily.


Step 2
Create a loop and attach the burlap to the next wire in on the wreath frame. A couple of things to note: This is not a science, and your loops don't have to be perfect. Just work your way up and down the wreath frame, shoving the loops together and adding more. It takes a while to work around the wreath, but you'll use both rolls of burlap.


Step 3
When you've made it all the way around with the burlap it will look something like this. Notice the "bare" spot in the top right (2 o'clock) where you'll attach the bow.


Step 4
Time to make the bows. Make four loops out of your solid burlap ribbon and tie them together with floral wire that is 7-8 inches long (don't cut off the excess wire).


Step 5
Make another four-loop bow slightly smaller than the solid bow. Use the wire on the solid bow to create the knot.


Step 6
Use the floral wire to attach the stacked accent bow to the wreath base, and then adjust it until you like how it appears. You may also need to adjust the burlap below it so that the ribbon lays properly.


Step 7
Use your wire cutters to remove the leaves from the floral stems. Cut the blossoms off the floral stems, leaving just 1 inch of stem on the blossom. This is enough to secure to the burlap with hot glue.


Step 8
Keep the wire cutters out. Flip the wreath over and wind the wire ends from the burlap back up into the wreath. Trim the ends were necessary. They key here is to make sure you can run your hand along the back of the wreath without being scratched. Adjust any rough spots so you don't damage your door.

Step 9
Attach the flowers with minimal hot glue if you want to be able to swap out the colors with the seasons. Wire the letter to the wreath. I also added a few hot glue dots here and there because I didn't want the letter to shift. My floral wire was green, so i hit it with a Sharpie marker and a decorative gold marker to mimic the detail on the letter. You can't tell unless you're up close to the letter, which is fine -- it's a wreath, people!


LinkWithin

Related Posts Plugin for WordPress, Blogger...