February 23, 2020

Two Quick Baby Quilts

I recently finished two baby quilts in record time (for me, a notoriously slow quilter). I have a number of quilts in progress that I've been working on for a year or more, so it's satisfying to be able to start and finish something on a smaller scale in about a month.


The first one was a request from a friend who lives in Ireland. She asked for a gender-neutral baby quilt in soft colors that she could give to a friend, and she wanted it to include fabric with teddy bears or rocking horses if possible. I pulled out a couple of charm packs from my stash that I wasn't particularly attached to (I think I received them as a gift) and removed the most-feminine prints. After coming up empty at all my usual online quilt shops, I turned to Spoonflower to look for teddy bears or rocking horses that would work with the charm squares. Luckily, there was one print by French artist Helene of Le Vent & La Discorde that fit pretty well with my color scheme, and I was able to order a fat quarter of it during a sale.


The pattern is called Jane's Ladder by Allison Jensen of Woodberry Way -- it's available for free from Moda Bake Shop here. It's a twist on the traditional Jacob's Ladder design and is very easy to put together. I'm not sure what manufacturer or color the pale green background fabric is -- I bought a bag of scraps at Crimson Tate Modern Quilter the last time I was in Indianapolis, and there was a surprising number of these green charms tucked into the stack. Turns out there were enough to use as the background of this baby quilt. The backing and binding is Michael Miller Cotton Couture in Glass. I did the free motion quilting (my favorite go-to quilting design because it's very forgiving) on my Juki TL2200QVP Mini.


My second fast baby quilt is bolder but again uses a colored background fabric instead of the usual white/ivory/gray. It's one of my goals this year to use more colored backgrounds, and baby quilts are a low-pressure way to try it out. This one will be donated to my local chapter of Project Linus to be chosen by a child in need of some comfort.

This pattern is Sparkle from Allison Harris' book Growing Up Modern. The print fabrics were all collected from a destash by one of my local quilt guild friends. I grabbed them because they all coordinated well and I knew they'd make a good donation quilt for a child. The background fabric is Michael Miller Cotton Couture in Marine.


I quilted this one in straight lines with varied spacing, eyeing my lines and trying to keep them pretty straight without using a guide. It's not perfect, but it crinkled up nicely after washing and drying, and that hides a lot. All in all, I'm happy with how it turned out and with the fact that I was able to use fabric on hand.


February 2, 2020

Spring Thaw Quilt

One of the first activities my quilt guild (Knoxville Modern Quilt Guild) does every year is set quilting/sewing/creative goals. We pull them out at our holiday party in December to see how well we did and how much we accomplished. One of my goals this year is to blog at least once a month. I missed January -- great start! -- but I've decided to just double up in February to make up for it. I have a bunch of finished quilts and other projects that I haven't shared here, so I should have enough content to make it through the rest of the year. Even if a lot of people don't see these posts, I like having the record of what I've made.


Every year, I set a goal of making more quilts and things from the books and magazines I've collected. This pattern, called Spring Thaw, was designed by Jodi Nelson and appears in the March/April 2015 issue of Quilty magazine.


I started this quilt in 2018, but years before, I won a fat quarter bundle of Sweetwater "Noteworthy" fabric from an online fabric shop. It turns out that 42 fat quarters go a loooooong way, and this is the second pretty large quilt I've made using that bundle. AND I still have some fabric left that could become yet another quilt. Here's the first one, made using a quilt-as-you-go method and donated to Project Linus for a teen in need:


I started out making a twin-size quilt like the one in the pattern, but when it was on my design wall and the bottom rows were cascading down onto the floor, I started to wonder why I was making it so large. So I removed some rows and columns and it finished around 51 x 64. I found the rose-colored backing fabric on the clearance shelves of a local quilt shop, and the longarm quilting was done by local quilter Pat Pike. Since I didn't have a plan for this quilt -- it wasn't made for anyone in particular or for me to keep -- I decided to see how aqua quilting thread turned out. I like it a lot -- it's playful and a good fit for the overall design.


I started this back in 2018 and finished it in 2019 -- feels great to finally have it done! Now it just needs a home... Quilt for sale! Quilt for sale!

December 15, 2019

Wonky Pound Sign/Hashtag Block


Whether you call it a pound sign, hashtag, nine-patch, tic-tac-toe or something else, this grid block is an easy one to make. The following instructions are for members of the Knoxville Modern Quilt Guild, as this block is being collected for our next charity quilt, but anyone is free to make it!

KMQG:
Please use this color palette -- solid fabrics and white. You can make the strips white, as I've done here, or reverse the color placement so that the background is white and the strips are one color.

Blocks are due by the meeting on February 15, 2020. Email modknoxville@gmail.com with questions!

The unfinished block should be 13.5 to 14 inches. Do not trim the block to size. Just turn it in as it is, and the volunteer who pieces the top can trim all blocks to a consistent size.


STEPS:

1. Start with a square at least 12.5" and four strips 1.5 x 15."

2. Use a ruler to cut the square into thirds. The cuts can be slightly slanted, but if you're more comfortable with precise, straight lines, feel free to do that instead. (Tip: I tried this block without using a ruler, and it made the strips harder to piece. So grab that ruler and rotary cutter.)


3. Insert two strips into the cuts, and piece the square back together. Press the seams open. With wonky lines, it's a little tricky to get the outside edges of the square aligned again, so take care and do your best. Remember that the block will be oversized, so it's okay if the edges are a little bit off (like mine are!).


4. Use a ruler to cut the square into thirds again, perpendicular to the first two strips. (Again, if you're more comfortable with precise lines, you don't have to make them wonky.)


5. Insert the remaining two strips into the two cuts. Pin and sew them to two sections. Press the seams open.


6. Now you need to sew the three sections back together. If your strips are precise, line up the strip seams on both sections, pin and sew. Press the seams open.

If your strips are wonky, this is the trickiest part of the block because the seams don't line up exactly across the break. Lay the two sections together and eyeball the alignment of the vertical strip so that it doesn't appear to shift to the right or left as it's intersected by the horizontal strip.
Then carefully flip them right sides together (I flip the lower section up so that it's on top). Try to do this flip without shifting the piece to the right or left. Pin to avoid shifting while sewing.


In the photo below, you can see that the vertical seams look pretty well-aligned on either side of the horizontal strip. Check your piece to see if they look aligned before you start sewing. You can also experiment with putting a pin in one seam and trying to line it up with the other seam. Or if you have a trick for getting this part right, let me know!


Sew two sections together, and press the seam open. Then repeat the alignment with the third section. Flip, pin, sew and press the seam open.


7. And there you go! Your block is ready to be trimmed to size (or not, if this is for the KMQG charity quilt).

October 17, 2019

Quilty Hearts Quilt


A lot of quilters who design patterns also organize quiltalongs for the pattern release. It's a period of weeks or months when quilters are encouraged to buy the pattern and join the fun, making the quilt at the same time and posting their progress on social media. There are usually benchmark goals and prizes involved. A couple times a year, I get sucked into this excitement. Sometimes I talk myself out of it, but sometimes I join in, knowing from the start that I won't be able to keep up with the pace. I guess I'm not technically quilting along when I'm actually working at my own speed and making the quilt in my own time, but it's the idea that counts. And the quiltalong motivates me to start the project even though I'm always so far behind that I'm not eligible for any prizes.


This year, the pattern that got me was Quilty Hearts by Emily Dennis of Quilty Love. What do I like about this quilt? It's block-based, set on point, and scrappy. It's also easy to cut and assemble, so it was a good project to work on a little bit here and there whenever I had time (evenings and weekends).


Initially, I thought that I might give this one to someone in my family, but when it came time to choose the backing fabric, I struggled to find something that would work with their home. So I decided not to force it and changed my plan -- I gifted this quilt to my friend Jessica and her family. They have pops of color in their living room that I thought would make it the perfect home for the quilt.


The fabrics in the hearts have a lot of memories attached to them. Some of them were used in the two quilts I made for Jessica's daughters. Others appeared in quilts for my nieces, clothing I made for myself, dresses that my mom made for my nieces, and gifts I've given to friends and family. The thing I love about scrappy quilts is that they remind me of everything I've made -- I can remember where each fabric was used before.


Being twin size, this quilt needed to be longarmed, so I sent it off to my fellow Knoxville Modern Quilt Guild member Pat. The scalloped quilting adds some soft curves to this otherwise sharp and blocky design. The binding is the same fabric as the backing.


This quilt was a lot of fun to make, and I'm pretty proud that I managed to both start and finish it within the same year!

February 6, 2019

Fieldcrossing Quilt


I finished this quilt in September, but it had to wait for its recipient's October birthday, and now I'm MONTHS late in posting it here! But I'm excited to share it now that it is settled in its new home in Texas. I made it for my good friend Eryn and her family. Around 8 years ago, I made Eryn a quilt and I had no idea just how much it would be used and loved. It was so loved, in fact, that I brought it home with me to Tennessee last summer for some mending and a new binding after I visited Eryn and saw what a state it was in! That was when I decided to make her a new quilt.


(For anyone paying close attention, Eryn is my friend with the twin babies -- a boy and a girl -- who I made quilts for last year. I posted about them here.)

When I was in McKinney visiting Eryn, we took a little field trip to Stitched with Love, a quilt/fabric shop very close to Eryn's house, where I was unable to resist the urge to buy lots of fat quarters as fabric souvenirs. A few months later, Eryn sent me a Christmas gift ... more fabric from the shop! All of the sudden, my plan came together -- I'd make a new quilt for Eryn and use some of the fabrics that she had picked out. She had bought them (for me), so she must have liked them, right?

Source

The pattern I decided to use is called Fieldcrossing, designed by Elizabeth Olwen. It's a free pattern offered by Cloud 9 Fabrics.


I started the project at a retreat with the Knoxville Modern Quilt Guild and was able to get the top pieced -- minus some borders that required more fabric -- by the time I headed home.


Because the quilt was pretty large, I handed it over to my local longarm friend, Pat, to quilt it with an edge-to-edge design. Instead of using a lot of white, the background fabric has a subtle texture design, and the backing is Moda Grunge Hits the Spot in a low-volume beige that I thought would hold up well to lots of use.


June 29, 2018

My Master Bathroom Renovation

Before (yuck)

My 3-bedroom, 2 bathroom condo was built in 2000, and when I bought it and moved in back in the fall of 2015, I knew immediately that I'd eventually want/need to make some changes to the master bathroom. At some point during its life, previous owners gave this bathroom a few updates. I think someone removed a bathtub/shower combo and put in a vinyl shower insert, the toilet was replaced, and an appallingly large 3-section medicine cabinet was put up. After the first few nights of bonking my head on the cabinet every time I bent down to brush my teeth or wash my face, I knew it would have to go. But not right away. It wasn't until the plastic and rubber parts of the original builder-grade faucets started to disintegrate that I decided to make a change. So really, this all started with faucets. IT ALL STARTED WITH FAUCETS.

My dad, the tile-demo expert

I wanted to replace the faucets, but I didn't really want to just replace them with new low-spout faucets that would fit under the stupid medicine cabinet, so I started thinking about higher spouts, which led me to look at widespread faucets instead of center-set. And that led me to consider a new countertop and sinks. At that point I was leaning toward keeping the cabinet and having it painted. But I really despised the pinkish-tan floor tiles that looked very dated to me and hadn't held up all that well in the last 17 years. When I discovered that the pinkish tiles ran under the cabinet, the project got a whole lot bigger.

This is when I realized a plumber needed to cut and cap all the supply and drain lines before I could remove the old cabinets. Unexpected expense!

So where did I end up? New floor tile, cabinet, countertop, sinks, faucets, mirrors, light fixtures, cabinet hardware, wall paint, baseboards and shoe molding, and switchplate covers just for the heck of it. The only things I haven't changed are the towel bars (which I bought last year), toilet (replaced by previous owners and totally fine), and shower. My long-term plan is to remove the shower insert and have it all tiled and new frameless doors installed. For now, it's totally acceptable -- and it's tucked back into the corner of the bathroom, so it's easy to ignore. It just wasn't in my budget right now, and I couldn't handle making any more choices and arranging the work.


After demo, the first new thing to go in was the tile floor. My vision from the start was to make the room bright, crisp, and clean. I considered large porcelain tiles, but the small mosaic design had been in my mind the whole time, and I ended up going with white and gray octagon-and-dot tiles. These came from Lowe's, but I saw the same tile available in a few other stores. I chose white grout and was assured that this particular grout is high-quality and repels dirt and staining. Fingers crossed!


I kept my cat Frannie out of the room while there was exposed concrete and pipes, so she was surprised by the feel of the mosaic tile on her paws when I finally let her back in. The new Shaker-style gray cabinet is Waypoint in Stone. I chose gray versus a white cabinet so that it would provide more contrast with the tile floor. And with a light countertop, I think it all works well together. The cabinet hardware is Kohler. I worked with a local kitchen and bath store for the cabinet, countertop, and sinks. I found the chrome hardware at another design/plumbing supply shop in town.


This photo is the best representation of the light and how everything looks in the room. The countertop is Viatera Minuet quartz, and I chose white rectangular under-mount sinks. Initially, I thought I wanted a more subtle white quartz with little to no veining. But when I saw the large display slab on the wall at the stone shop and held a cabinet door up to it, I really liked the look of this one. My mom and I agreed that the veining was interesting but not overpowering and a good complement to the cabinet and tile.


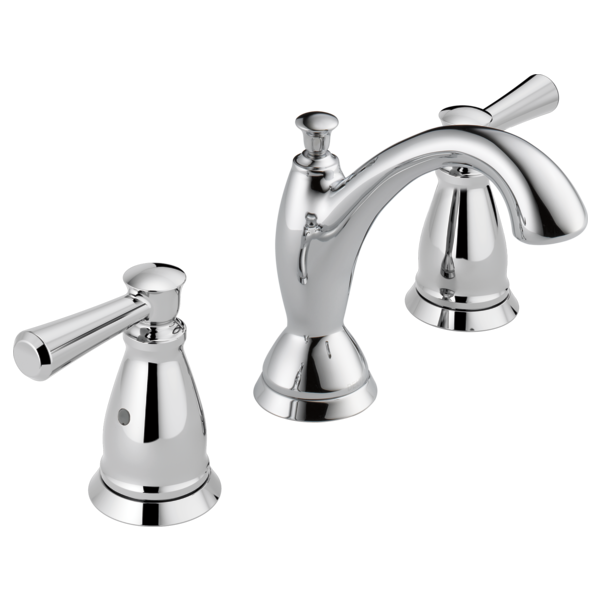
This whole project started with the need for new faucets, and these were so hard to choose! I looked at every faucet I could find, at every plumbing supply store in town, and I still wasn't thrilled with my choices. I couldn't find anything that was just right, and I finally settled on this Delta Linden widespread faucet. The spout was fine, but I didn't love the handles that I saw in the store -- and then I realized that there was a different handle design option available. I greatly preferred the handle you see above, so all in all, I'm happy with these faucets.


The rectangular mirrors with a beveled frame are from Lowe's. The mirror size and shape was another difficult decision (pivoting? framed? oval? rectangular?), but these turned out to be perfect. The round rugs with a little crocheted edge detail are from World Market (and they come in a variety of colors).


And finally, these aren't the greatest photos, but new light fixtures made such a difference in the space. The vanity fixture is from a local lighting store and is actually the first thing I bought for the renovation. I despised the curvy fixture it replaced and couldn't wait to see it go. The flushmount on the ceiling is the second one I tried. The first one was an LED that looked too much like an oversized tap light to me. So I tried this Pottery Barn Hayden Flushmount in satin nickel finish, and it's perfect.

One last thing -- the wall color is Sterling White by Sherwin Williams. It's a pale gray -- definitely more sterling than white -- complements the grays in the tile and cabinet but is still bright enough to bring lightness to the room.

LinkWithin

Related Posts Plugin for WordPress, Blogger...