March 29, 2012

How To: Make a Horseshoe Ornament

At long last, I've put together a little tutorial for my March ornament challenge creation, the horseshoe.  (If you want to refresh your memory, my original post is here.)

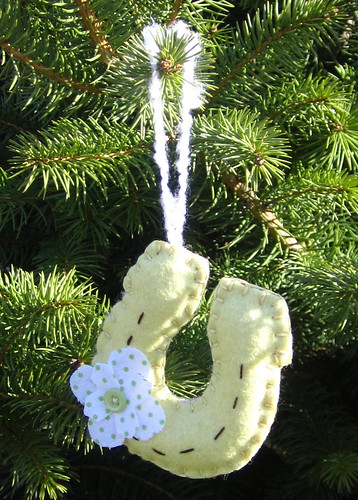
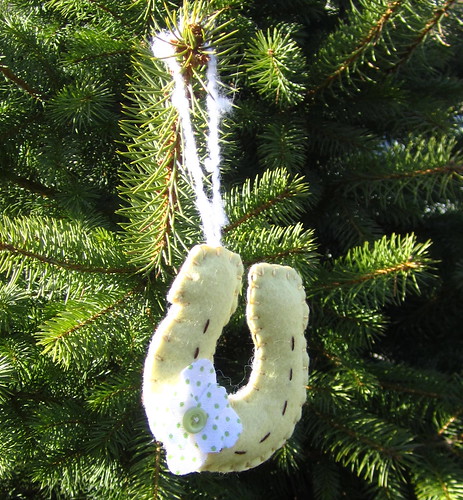
You'll notice (perhaps) that this horseshoe is a little different than my first one.  The changes are not intentional -- I was just too lazy to run downstairs and get ornament #1 when making and photographing ornament #2, and I decided to wing it.  Lesson learned.


1. To start, you need a piece of felt, a scrap of print flannel (my scrap is much larger than you need), the horseshoe template, a button, embroidery floss, and something to serve as an ornament hanger (I used a piece of thin ribbon).
  ** To download and print the template, click on the link above, which opens the file in Google Docs. Use your mouse to click on File (top left of screen), and then choose Download and save the file to your desktop or wherever you'd like to keep it. Then print and cut out the horseshoe. (The whole page should print in the correct scale, although with this ornament you can adjust the size as you like.)


2. Pin the horseshoe template to the felt and cut out two shapes - one for the front and one for the back.  Or fold your felt and cut two shapes at once.


3. Cut a flower from the scrap of flannel. To add dimension, cut two flowers - one smaller than the other - to stack on the horseshoe.


4. Position the flower on one horseshoe (this will be the front), and sew the button in the center of it.

5. Pin the two horseshoe shapes together and blanket stitch the edge, starting at the bottom right (where the flower is on this ornament).  I used embroidery floss in a contrasting color for this pink horsehoe, but you could use a matching color to make the blanket stitch less visible.
I have a terrible memory for this sort of thing, so when I forgot how to do the blanket stitch, I re-learned it using this video.

6. When you get to the inside curve, stuff the side you've already stitched with a little polyester batting.  Before you stitch across the top of the horseshoe on the left side, tuck in the ends of a hanging loop (ribbon, in my case), and then continue stitching.

7. As you begin to stitch toward the bottom on the left side, pause and stuff more batting up where you've already stitched.  As your blanket stitch approaches your starting point, add the last bit of batting to fill out the shape, and then stitch closed.


March 27, 2012

Personalized Craft Labels

I celebrated my birthday recently, and I was so happy to get these personalized craft labels from Jen!

Labels

I've wanted to get labels for my handmade goods for a while now but could never make up my mind about what they should look like and where I should order them from.

Purchased on Etsy from Mommie Made It, http://www.etsy.com/shop/MommieMadeIt?ref=pr_shop_more, the design is printed on twill tape.  I'm looking forward to attaching them to a few quilts I have in progress.  Thanks Jen!

Labels

March 22, 2012

Block of the Month Project: Block #3

In February, Craftsy's Block of the Month series took us on an adventure with half-square triangles.  I say "adventure" because Amanda, Caitie, and I all suffered some bumps and bruises and ripped out stitches.  But we also learned about accurate piecing, magic methods, and the all-powerful scant 1/4-inch seam, and in the end we have these lovely Balkan Puzzle blocks to show for our effort.

Block of the Month, Block 3

We followed the instructions for creating half-square triangles using the so-called magic method: You stitch a scant 1/4-inch seam all the way around two squares postitioned right-sides together. Then you slice the square up on the diagonals, press the pieces open, and have 4 half-square triangles on the bias to work with. Because the units are cut on the bias, they're very stretchy and can be tricky to work with without pulling them this way and that. Between the stretch and some inaccuracies in my scant 1/4-inch seams, I found myself in a Goldilocks situation with this block: My first attempt was too small, and my second attempt was too big. For the third try, I opted for the traditional method for creating half-square triangles, and my block was just right. Plus, I have 2 spare blocks to piece into the backing now, so all that effort was not totally wasted. Thank goodness for extra fabric!

To see Block #1, click here.
To see Block #2, click here.

March 21, 2012

Easy Snap Dress


I'm a big fan of prudentbaby.com so I had to give the easy snap dress pattern featured on their site a try. I selected a simple cotton diagonal, pearl snaps and bias tape all from JoAnn's. I had enough fabric left over to make a matching diaper cover (pattern also courtesy of prudentbaby.com). You'll have to excuse the hem for now, I'm waiting for the little one to get here in order to hem it at the correct length. I was able to complete both on a Saturday, and for my first time using this pattern, I think it turned out pretty well. I would cut the yoke pieces a little larger next time, but other than that, I would highly recommend giving it a try!

March 13, 2012

Block of the Month Project: Block #2

In keeping with the theme of slashed blocks, Crafty's second block for January is the wonky pound sign.  For this block, Amanda, Caitie, and I took a little artistic license.  Amanda and I reversed the fabric placement so that the strips are neutral instead of print (as they were in the instructions), and Caitie opted for two prints.

Block of the Month, Block 2

This is a very easy and versatile block to make.  You could build a whole quilt top with this block, alternating the fabric placement with each block, or making them all the same but allowing the crookedness of the lines to create improv intersections.

March 12, 2012

Pillowcase Dress


Pillowcase dresses for little girls have become very popular in the last few years, so what a perfect project to pull out and try on a rainy Saturday.  I used the pattern provided on Prudent Baby, which turned out great. This is a perfect project for the beginning sewist so don't be intimidated...give it a try! Once you realize how easy they are, make a few more for Little Dresses for Africa, a non-profit that provides colorful dresses to girls in Africa, giving them confidence and showing them just how worthy they are! In addition to this summery polka dot for my little one, I picked up some colorful fabric at JoAnn's that is perfect for a dress destined to be enjoyed halfway around the world.

March 9, 2012

Quilting Weekend

This evening I'm headed to an overnight quilting retreat with members of the Indy Modern Quilt Guild, and I'm so looking forward to it.  If you don't see the fun in this sort of thing, well, clearly you're missing some crafty DNA or something.

I plan to start piecing a new baby quilt (commissioned by a friend) and work on a block tutorial that I've been asked to lead at the next IMQG meeting.  Of course this will all be accomplished amidst good company, good food, a few games, and the whirr of sewing machines.  I've heard rumors that cupcakes and Sangria will also be involved...now are you jealous?

Indy Modern Quilt Guild

March 8, 2012

DIY Custom Shelf for the Nursery


I was looking for a shelf to place above the changing table that could hold 2 very important items: the baby monitor (it's a video monitor, so we need it above the crib) and toys to hand our little girl to distract her while changing. I found this shelf at Pottery Barn Kids that was perfect but out of my price range...way out.

So I decided to make my own custom red shelf with help from my local craft store and about $35 worth of supplies.  Here's how I did it -- and how you can do it too:

1.  Stroll through the wood materials section at your local craft store and pick out a shelf. (If your craft store is JoAnn's, use one of the neverending 40% off coupons that you surely get via snail-mail or email to make it an even better deal.)

2.  Remove the hardware and sand the shelf all over with sandpaper. This step is not fun but very necessary to ensure that no one ever gets a splinter, and a well-sanded finish will give you better results with the paint job.


3.  Spray with your choice of colored spray paint. You will notice that I took the shelf out and laid it in the yard for painting.  I've found this is the best way to minimize cleanup -- just mow the grass to get rid of the overspray. This method also saves me from peeling off newspaper stuck to the shelf, which is not pleasant and requires more sanding.

4.  After applying one coat and letting the paint dry thoroughly, sand the shelf again and then wipe with a damp washcloth or tack cloth to remove the dust. Allow the shelf to dry if you used a damp washcloth. (I didn't have a tack cloth and going to the store just wasn't on the list that day, so I let it dry outside.)


5.  Apply a second coat of spray paint, and let it dry. The secret to spray paint is several light layers. Fight the desire to lay on a thick coat -- it will just run and make a mess.

6.  Apply coat #3, and let the paint dry for a couple of hours.

7.  Apply coat #4, and -- you guessed it -- let it dry for a few more hours.  (Isn't this fun?)

8.  Apply another coat of paint if you're not satisfied with the finish, but if you're happy with it after 4 coats, let it dry overnight.

9.  Reattach the hardware, hang on the wall, and decorate!

March 6, 2012

Luck: 12 Months of Ornaments

March ornament: Lucky Horseshoe

For my March ornament, I made this pale yellow horseshoe.  I found a basic horseshoe shape online and used it as my template.  The front is a pale yellow wool felt, and the back is dark brown felt.  I used scraps of flannel with pale green polka dots to craft a simple two-layer flower with a green button accent.  A bit of yellow and brown embroidery floss hold it together and add a little extra interest, and it hangs from a scrap of white boucle yarn.

March ornament: Lucky Horseshoe

In all honesty, I wasn't sure what I was doing when I started this ornament and didn't know if it would turn out well, so I didn't take any pictures of the process.  (So sad, I know.)  But check back later this month for a simple tutorial for making a lucky horseshoe of your own!

March 3, 2012

Favorite Things: Zutano at Hobby Lobby


You can imagine my surprise when this cute little plate caught my eye at Hobby Lobby last week. There were 2 plates stacked on a multi-tiered display so I picked it up to check the price and when I flipped it over I saw that it was from Zutano! If you are familiar with the Zutano brand, you know that their children's clothes are adorable...and expensive. This plate is an inexpensive way to enjoy their cheery designs (love the owls!) without spending a mint. So, if you're out an about and looking for a cute baby shower gift under $5, try Hobby Lobby.

March 1, 2012

Luck: 12 Months of Ornaments {March Theme}

May your pockets be heavy and your heart be light.
May good luck pursue you each morning and night
.

Today is the first day of March, so we're kicking off our third installment of the 12 Months of Ornaments Challenge.  This month's theme is...

~LUCK~

Jen and I will get to work on our ornaments, and we'd love for more of our friends to join in as well.  Just post a picture of your ornament in our flickr pool here.

LinkWithin

Related Posts Plugin for WordPress, Blogger...