December 1, 2014

2014 Holiday Wreath: Candy Cane Monogram


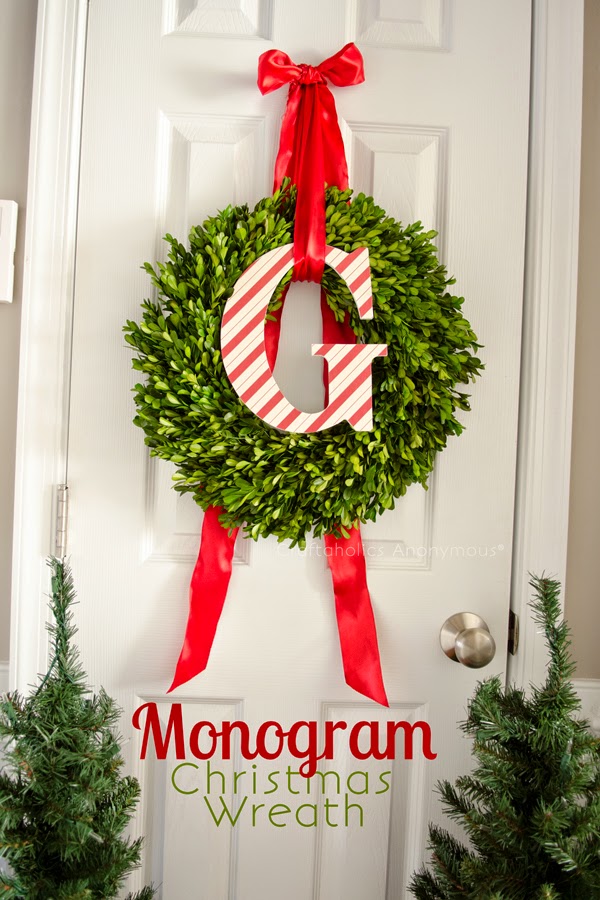
Ta-DA! Here is my 2014 Christmas wreath that ran me a whole $5 this year because many of the materials came out of storage bins in my basement. The wooden "G" was a Joann's purchase along with a little bottle of white acrylic paint and a red paint pen. The wreath, ribbon, and clip-on poinsettia were all Christmas leftovers.

Looking to recycle an old wreath into something new to dress up your door? Follow these simple steps:
  1. Remove adornments from an existing wreath (or pick up a new plain wreath if you don't have an old one to recycle). My old wreath had some gold jingle bells and some plaid ribbon wrapped around it, and it didn't even come out with the rest of my decorations last year, so it was primed for a comeback.
  2. Select 3-4 yards of wired ribbon. I was able to find a spool of ribbon in the depths of my holiday decor stash, but if you have to buy it new, it should cost around $3-$6 on sale (and this time of year, practically everything is on sale).
  3. Purchase a wooden letter and paint it white. I applied two coats to make it opaque. Don't waste any time sanding the letter before you paint it unless your letter could cause splinters or prohibit you from drawing straight lines across it easily.
  4. After the white paint is dry, use a ruler and pencil to draw diagonal lines across the letter every 1/2 inch.
  5. Use a red paint pen to create the candy cane effect, drawing over and filling in between your lines as pictured.


I used a length of ribbon to tie the "G" to the wreath and then hid it with a poinsettia-topped bow. The lengths of ribbon behind the wreath are simply looped onto the wreath hanger and draped behind the wreath for a little sparkle.

Pinterest is the best place to find wreath inspiration. Below is the original from Craftaholics Anonymous. Instead of decoupage, I painted. And instead of purchasing a new boxwood wreath, I recycled some faux greenery. The end result is essentially the same, and it cost a lot less, which makes it a hands-down winner in my book.

http://www.craftaholicsanonymous.net/monogram-christmas-wreath-tutorial

November 12, 2014

Big Finish: Rainbow Volume Quilt


I started this baby quilt as part of my post for Craft Buds Craft Book Month in September. The pattern is from Emily Cier's book Scrap Republic, which offers 8 bright and colorful patterns and loads more ideas for using scraps and mixing things up. When my turn came around to post for Craft Book Month, I only had the quilt top done -- you can see that post here.

Volume quilt

I decided to finish this quilt as a baby quilt for someone special, so I sifted through my stash looking for potential backing fabrics. Luckily, the front is so colorful that almost anything looks good on the back. I decided on a large piece of this pink apple print that I'd picked up at a backroom clearance sale at my mom's local quilt shop in TN. I added a coordinating green print from DS Quilts to make up the difference.

Volume quilt

This small quilt with straight column seams was a great opportunity to experiment with some new machine quilting. I used my walking foot, increased the settings for my zigzag stitch, and quilted on either side of each vertical seam. With so many seams in the piecing, I think any denser quilting patterns would have made the whole thing just too stiff. The minimal zigzag quilting secures the quilt and adds enough visual interest and texture without going overboard. For binding, I got lucky and had enough of this bias stripe left over from another quilt (seriously, I had about 6 inches to spare - perfect fit!). The colors were right, and I was happy to not have to make binding for a change.

Volume quilt

I love how this quilt turned out. Everyone who sees it in person says "It's so much smaller than it looked in your photos!" But I think that surprise is part of the fun, and it makes for a perfect baby quilt. I can't wait to send this one off to its new home where I know it will be used and loved for a long time.

Volume quilt

November 11, 2014

Big Finish: My 2012 Craftsy Block of the Month Quilt


This quilt has been a long time in the making. Back in February 2012, I'd finished teaching 2 of my friends the basics of quilting with some simple patchwork quilts for donation, and they were eager for another project. We found the free Craftsy Block of the Month (or BOM) series that was just getting started with instructor/blogger Amy Gibson. For 10 months, the series supplied patterns and instructions for 2 blocks each month -- all different and each one using new skills and techniques.

2012 Craftsy Block of the Month

We bought our fabric and got started, meeting after work at each others' homes to work on our blocks together, and I posted most of our finished blocks here on the blog along the way. Amanda went on maternity leave and had to put her project on hold, but Caitie and I kept meeting and eventually finished our 20 blocks.

2012 Craftsy Block of the Month

Caitie was the first to assemble her quilt top and begin quilting. I was drawn into some other projects and took a little more time to figure out what kind of border I wanted to add to my quilt. Then I changed my mind and needed more time to actually piece the border, a scrappy variation on Dresden plate wedges.

2012 Craftsy Block of the Month

I have to admit that by the time I'd finished my quilt top, I was pretty tired of looking at it and not at all interested in attempting to quilt it myself. So after letting it hang in my closet for a while, I contacted Melissa at Sew Shabby Quilting. Best. decision. ever. Melissa was great to work with -- responsive, skilled, affordable, and fast. I sent my quilt top and backing to her in Utah and had it back -- longarm quilted beautifully -- in around 3 weeks.

2012 Craftsy Block of the Month

I bound it by hand with a green print that I had in my fabric stash (yay for not spending more $!), and following a spin in the washer and dryer, the quilt that was more than 2 years in the making is finally cozying up my bed, just in time for the chill of fall and winter.

September 15, 2014

Craft Book Month: Scrap Republic


Happy Craft Book Month! I hope you've been enjoying all the wonderful projects and posts you've seen so far as part of this little celebration. I love the see the wide range of projects that people are tackling and the diverse selection of craft books they come from. I've spotted a few new-to-me books in the group that I will definitely be checking out soon.


This is my third year participating in the blog hop for Craft Book Month, and I'm honored that Lindsay at Craft Buds asked me to participate. Initially, I had a book and project in mind. I didn't own the book, so I requested it from the library and sat down with it. After a few days of mulling it over, I decided to set that book and project aside -- I just wasn't feeling inspired. And that's okay, right? Instead, I picked a book from my own collection, Emily Cier's Scrap Republic. This book published in 2011, so it's not new on the scene, but it's not to be missed. My non-quilty friend Jessica bought me this book for my birthday years ago; she'd seen it at the bookstore, thought it was cool, and thought I might enjoy it. At the time, I loved flipping through the book, but I just never got around to making any of its scrap-tastic projects. And so Scrap Republic sat on my bookshelf, forgotten and unappreciated, until a few weeks ago.


There are 8 cool, colorful projects in this book. One thing I love about these designs is that they look far more complicated than they truly are. I chose to make the Volume quilt, thinking it would be a great way to both sort and use up a lot of my scraps. I like that Emily provides a second option for each project, calling it "Solace for the Scrapless." It's a clever way to change up a pattern depending on the fabrics you have on hand.

I cut many more scraps than I needed (which means there's another Volume quilt in my future, for sure), and once I got to work chain-piecing and putting the pieces up on my design wall, I couldn't stop. This quilt is addicting. Consider my Instagram activity as evidence:


As you can see (I hope), I chose to put my lighter shades to the left and let the color intensify as the eye moves to the right. I had a lot of fun picking my scraps for each section and positioning them so the color saturation moved the right way.


Thanks to some other projects in my queue lately, I wasn't able to completely finish this quilt in time for today's post, so I'm sharing the finished quilt top now and I'll share the finished quilt shortly. I have a plan for this one and can't wait to see it finished, gifted, and enjoyed. And I'm confident that I'll be picking up Scrap Republic again for more projects in the future.


2014 Craft Book Month Blog Hop!

I've teamed up with some fabulous bloggers who will be showing off their projects made from craft books, all month long!

Monday 9/1: Fabric Mutt / Lindsay Sews

Tuesday 9/2: Rae Gun Ramblings / Craftside

Wednesday 9/3: The Feisty Redhead / The Fabric Studio

Thursday 9/4: Marci Girl Designs / Small Town Stitcher

Friday 9/5: LRstitched / A Prairie Sunrise
Monday 9/8: Hopeful Threads / sewVery

Tuesday 9/9: 13 Spools / Lisa Liza Lou

Wednesday 9/10: Stitch This! / My Sewcial Hour

Thursday 9/11: The Littlest Thistle / Fabric Seeds

Friday 9/12: Sew Sweetness / Clover + Violet

Monday 9/15: Inspire Me Grey / amylouwho

Link Up

9/1-9/30: Link up your craft book project at Craft Buds from your blog, instagram or Flickr account, and enter to win prizes. To participate in the month-long contest, just link up any project you've made from a pattern in a craft book. That easy! You'll tell us a little about the book, the project, how you personalized it, etc. Winners will be announced on Wednesday, October, 1!

Rules

1) One entry per person.

2) Your craft book project must have been completed in 2014.

3) Create a new blog post, instagram or Flickr photo (dated September 1, 2014 or later) and link back to Craft Buds/Craft Book Month in your post or photo description (tag #craftbookmonth for instagram). In your post or photo description, make sure to list the craft book you used and provide a link if possible.

4) All winners chosen via Random.org. Some prizes available to international winners, so please join us!


Prizes

Visit Craft Buds and link up your craft book project during the window of Sept 1-30 and you'll automatically be entered to win some fantastic prizes from the Craft Book Month sponsors!
Craft Book Month at Craft Buds

August 9, 2014

Freezer Paper Stencil Onesies


My niece Penny is a stellar baby model.  I wanted to make her some cute onesies, so I started with fabric appliques (like I've done before here and here).  She got a "P is for Penny," a little fussy-cut skunk ('lil stinker), and a hexagon with a little embroidered lamb (pattern from Nana Company here).


Then I decided to try something new: freezer paper stencils.  I spent some time looking for designs to use on Google Images -- you need a fairly simple design that lends itself to stenciling, meaning that you have to be able to subtract the design from the outline in order to put it back in with paint.


I tried my stencil technique with two designs for Penny: a feather and a ladybug.  I used Martha Stewart craft paint (suitable for multiple surfaces, including fabric), applied three coats, and heat-set it with the iron.  My sister reports that the painted onesies are holding up well in the wash, so the project is a success -- especially since Penny looks so darn cute in them.

Materials:
Craft paint suitable for fabric
Paintbrush
Design for stenciling
Freezer paper (NOT waxed paper)
Pencil
Craft knife
Scissors
Item to embellish (I used a onesie, but this method works on any fabric)


1. Trace the stencil design onto the paper side of the freezer paper (not the waxy side).  I like to tape them to a window -- design first, then freezer paper on top -- so that I can see the lines clearly to trace them.

2. Use the craft knife to remove the parts of the stencil that you want to appear in paint.

3. Iron the fusible paper stencil to the item you're embellishing, and get your paint ready.

4. Apply a light layer of paint to the stencil. Let it dry according to the paint directions, and then apply a second layer.  After the second layer is dry, you can add a third layer if you think it's needed.  I only used two layers of paint on my ladybug onesie.


5. After the paint is dry, carefully peel the stencil away.  It should come off pretty easily.

6. Heat set the stencil by placing a pressing cloth or thin dish towel on top of it and applying a hot iron.  And you're done!


June 13, 2014

#opgivewarmth: Charity Blocks for May

#opgivewarmth is a charity quilting project created by Sarah of {no} hats in the house.  Sarah's collecting blocks in a new color palette each month, and the finished quilts will be donated to foster kids in Indiana.  Check out my April blocks from here.

This is the palette Sarah selected for May:

Source

Both of my May blocks use foundation paper pieced patterns.  The first, the Geometric Star, is designed by Katie Clark Blakesley of Swim Bike Quilt; it's available in the book Vintage Quilt Revival.  The second, the Tilt a Whirl, is from Faith at Fresh Lemons Quilts; it's available here.


Like my April blocks, both of these finished 12.5" square.  May was fun - I'm looking forward to making some blocks for June!

May 22, 2014

Big Finish: Garden Fence Quilt


I'm certainly not a procrastinator by nature, but sometimes when it comes to sharing finished projects here on the blog, I just can't seem to sit down and get it done.  I finished this quilt in February, waited on its recipient to be born in late March/April, and now I'm finally sharing the Big Finish in May.  All this delayed gratification is actually for the best, though, because now I can enter it into the Blogger's Quilt Festival, hosted by Amy's Creative Side.  I'm entering my Garden Fence Quilt in the Large Quilt Category (it's twin size, approximately 63x85).  Click here to view the other quilts in this category, and starting Saturday, May 24, vote for mine if you like!


Some time ago, I admired this Little Apples quilt from Fussy Cut, which led me to the original Garden Fence block tutorial from Hyacinth Quilt Designs.  I made this quilt for my sister Emily's first baby, gender unknown at the time.  She and her husband picked out the fabrics for their woodland nursery (read more about that and the handmade items in it here), and Emily and I sat down last fall to look at blocks and patterns in order to find one she liked.  We spotted this design, and I knew I had seen and liked it before.  I added a few fabrics to their initial selection to balance out the mix.  It's an easy block to cut and assemble (even though there are 17 pieces in each block!), and it features the fabrics really nicely.


I quilted it with wavy lines in a honey-colored thread, which worked nicely both on the busy front and the dark back.  The backing fabric photographed much brighter in the sunlit photo above - it's quite dark and wine-colored in person.


I finished this quilt and mailed it to my sister in South Carolina before the baby was born so that she could finish decorating the nursery.  The quilt is twin-sized and made to fit a handcrafted daybed that my brother-in-law designed and built (the long back side that turns it from bed into daybed remains in progress).  The bed and quilt are gorgeous together - well done, us.  Baby Penelope arrived a short time later.

Home from the hospital
And here she is at 1.5 months, cute as can be:


Finally, this weekend I stitched up a label during a sew-in day with the Indy Modern Quilt Guild.  I typically put more information on my labels, but I wanted this one to blend in to the back of the quilt, so I stuck to the basics: recipient, year, and my initials.  (I downloaded a free font from www.dafont.com, transferred the text to fabric, and stitched over it.  I'm never happy with my penmanship on these sorts of things.)  I'll sew the label on the quilt when I visit Penny (and her parents) in a few weeks.


I had a great time making this quilt -- I loved the fabrics and design, and knowing it was intended for a new niece or nephew made the whole thing so much better.  Thanks for reading, and don't forget to vote for my quilt here!
AmysCreativeSide.com

April 26, 2014

#opgivewarmth: Quilts for Children in Foster Care

Not long ago I met Sarah of {no} hats in the house when she gave a little lesson on foundation paper piecing to the Indy Modern Quilt Guild.  I like her style.  When I was dragging my feet on joining the Forest QAL (quilt-along), she actually did it, and her finished quilt is amazing.  (I never joined, and so far I've only made the fox block from the QAL - I'll share it here soon.)

At the meeting, Sarah shared a new collaborative project she was just starting to pull together, #opgivewarmth.  You can read more about it here; the goal of the project is to make/collect quilt blocks that will become quilts for children in the foster care system in Indiana as part of the larger non-profit program My Very Own Blanket.  I've lived in Indianapolis for over 11 years, and I like the idea of doing something with a local benefit.  And although I don't have any personal ties to the foster system, my niece was adopted from an orphanage in Russia, so the idea of children not having much (or anything) of their own strikes a chord.  It's the very least I can do to play with fabric, sew up some blocks, and help turn them into quilts to comfort kids in tough situations.

Each month Sarah is posting a color palette to use as a jumping off point for creating blocks. 

Here are the two blocks I made using templates from Vintage Quilt Revival, an awesome quilting book that my sweet sister Emily sent me for my birthday.  The book is a collaboration by Katie Clark Blakesley of Swim Bike Quilt, Lee Heinrich of Freshly Pieced, and Faith Jones of Fresh Lemons Quilts.  Both of the blocks I made are Faith's designs.

exploding star block

tilted star block

Both blocks are 12.5" unfinished.  I think they turned out well and are a pretty close match for the chosen color palette.  I used fabrics from my stash and only purchased the sandy colored neutral.  I'm looking forward to seeing what Sarah chooses for May!

April 24, 2014

Easiest Easter Wreath Ever

Pin-spiration strikes again!  The simplicity of a Pinterest find led me to create a new Easter/spring wreath for my front door.  It might be because I have so much going on with my new planters that keeping the wreath simple was so appealing.

Pin-spiration Source: Maddy Jane Designs
Source: InspireMeGrey


I started looking around to create a version of my own, and here's what I found:

Materials:

  • A boxwood wreath: I found one at Target by Smith and Hawken that was more than I wanted to pay, but after shopping around at several craft stores (Joann, Hobby Lobby), I figured that what I was saving on the wreath I was spending on gas.  So I just bought the one at Target.
  • Ribbon: The burlap ribbon was half-off at Hobby Lobby. Keep an eye out because there are often great ribbon sales, but they typically hit during the week and end before the weekend begins. Tricky!
  • Fuzzy bunny: Did you know the best place to find these is eBay? Most run between $6-10 and are perfect for the width of the narrow wreath. I first purchased a fabric-covered bunny at Hobby Lobby, but it's base was too big for the wreath, so it will end up in some sort of Easter centerpiece next year instead.

Steps:


1.  Create a burlap loop around the top of the wreath, and hot glue the ribbon to itself. My wreath already had a substantial hanging loop on the back; if yours does too, just make sure you don't cover that up -- you'll need it. To cover my brassy door hanger, I used small dots of hot glue to secure the burlap ribbon to the hanger. I made a bow out of the ribbon and used more glue to attach it to the covered door hanger.


Source: InspireMeGrey

2.  Secure the bunny to the wreath. You could use hot glue to hold your bunny in place, but I chose not to do so on my natural boxwood wreath. Instead I positioned my bunny on the wreath and then used some double stick tape to attach the bunny's side to the door. It's still in place after opening and closing the door regularly, so it's a good temporary option.

Source: InspireMeGrey


April 11, 2014

Front Porch Container Gardening


Pinspiration from The Gilded Mint

Spring has sprung in the South, and I'm hoping that our last freeze has come and gone. My green thumb has been itching, so I dug into Pinterest to look for some container gardening ideas for my front porch. Last year, because of some landscaping work that had to be done, I really didn't do much except put a few ferns and begonias in pots on the porch here and there. This year it was time for a change!

My Pinspirations:

Source: Decoratingho.me
Source unknown
Source unknown

Source: The Gilded Mint

I love the hydrangeas in the containers by The Gilded Mint, and I think the picture sold me because my door and porch look very similar. So, away I went to one of my favorite local nurseries and found:

1. Two Planters - I actually found my planters at Home Depot after I purchased all my plants. They were more expensive than I had hoped, but I knew I would pay much more at the local greenhouse. I also knew that they would be protected from the weather and last a good long time on my porch, so I decided to commit to them. Make sure you get planters large enough for what you're planning to put in them. The two I purchased are 18-inch squares, but I would have been happier with something closer to 21-inch squares just to give the roots a little more wiggle room. I love the zinc finish on the planters in the photo above, but the only similar version I could find was waaaay out of my price range.

2. One Boston fern - Yes, that's one fern for two containers. My thinking here is that I want to give the fern a chance to grow and not be immediately root-bound in the container, so I cut the root ball in half with a pair of shears and placed them in the backs of the pots. (That trick also saved me $10.)

3. Two Hydrangeas - Do not buy hydrangeas that are already in bloom. These have been warmed up in a greenhouse and I'm guessing may go into shock during chilly spring nights. Instead look for smaller hydrangeas that are thinking about flowering. These are an investment around $30, so make sure they're happy and healthy.

4. Two Sweet Potato Vines - I love these limey vines and they just need to be kept trim. They like to spread, so keep an eye on them. They're nice and inexpensive at just $2-$5 each.

5. Two Asparagus Ferns (tentative) - I haven't purchased these yet and am planning to see if the three plants I've put in my planters fill up the space as they settle in and grow. The dimensions of my planter seem smaller than what was used above, so I'll add these ferns later if there's room. They are tucked away in the back of the Pinspiration photo so I'm not sure anyone would miss them.

The container 2 days after planting - the little purple flower was a leftover from the flowerbed plantings earlier in the day
I'm hoping to see blooms starting to appear once the hydrangea gets settled a bit. It's a spring to fall bloomer so my porch should have some color until I need to find a place in the yard to over winter them. Grow baby grow!

LinkWithin

Related Posts Plugin for WordPress, Blogger...