December 27, 2012

Big Finish: Embroidered Monogram Pillows

Embroidered Pillows

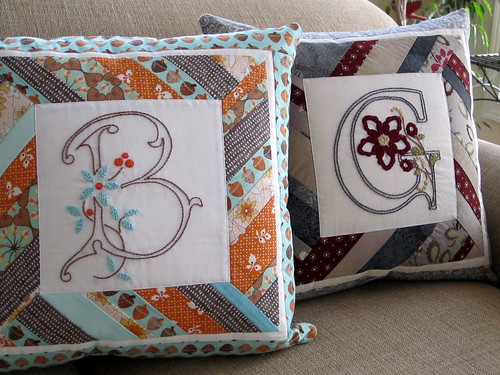
Now that Christmas has passed and gifts have been given and received, I'm happy to be able to share these embroidered pillows that I made for my two sisters. The letters B and G are for their last names.

Embroidered B Pillow

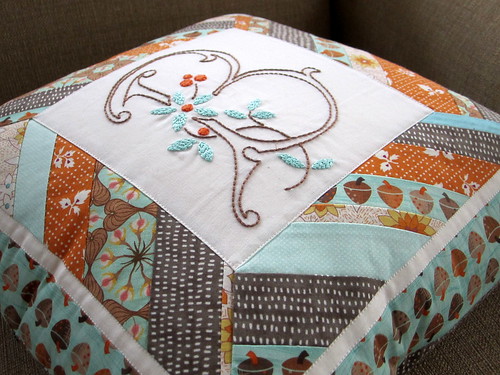
This project started with the B embroidery. I found the font pattern here, in the collection of flowered monograms from a vintage embroidery book, La Broderie Blanche, 1912.  I chose everything in this pillow to coordinate with the acorn fabric.

Embroidered B Pillow

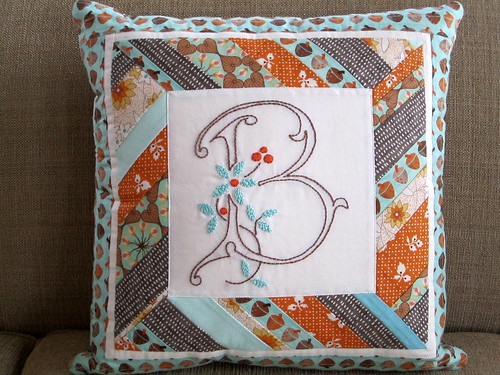
After I finished the embroidery panel, I considered a few different designs to frame it.  I settled on this Sun Rays block design from Twin Fibers (tutorial here).  I love the look of the mitered corners, and the strips allowed me to incorporate a lot of different fabrics to coordinate with the acorns.  The back of the pillow is done in the brown with white hash marks.

Embroidered G Pillow

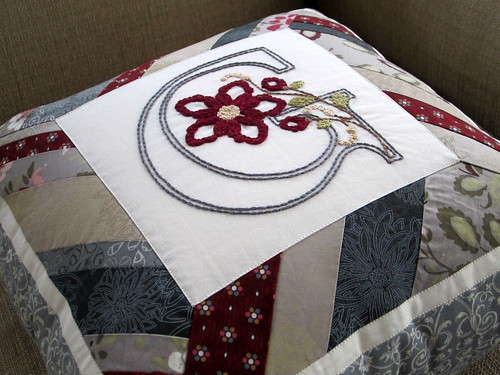
As I was working on the B embroidery, I decided to make another pillow with a G for my other sister. I decided to use a different monogram design (found here) and a different color palette.  I tried to just figure out the hand embroidery as I went along, and this design required a lot of fill stitches.

Embroidered G Pillow

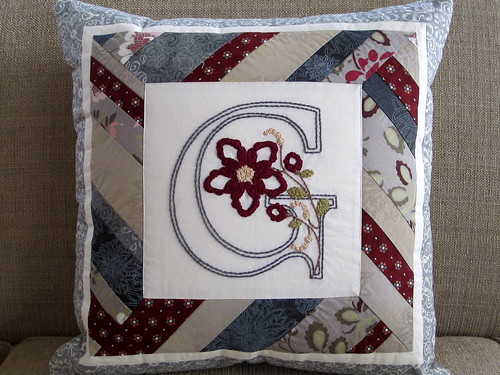
The fabrics in the surrounding Sun Rays block are almost all from a scrap pack that I received from Art Gallery Fabrics after I responded to a post about the giveaway on Facebook.  Lucky me!  The back of the pillow is the same grey scroll print that's just visible on the outer border.  For both pillows, I used this tutorial for adding a zipper with a flap to conceal it on the back.

December 18, 2012

Great Hostess Gift: DIY Mistletoe


Luckily for us, Hannah from Secrets of a Belle has been gracious enough to share her how-to for making your own mistletoe.  I don't know about you, but I love a little mistletoe around the house during the holidays, and this one I can hang up year after year which is great! Hannah created this cool felt mistletoe that is great over doorways, hanging on trees, or tied to a loved one's present as a decorative topper.

What you'll need:
Green felt
Pearls
Green thread
Ribbon (and thread to match)
Needle
What You'll Do:
  1. Download and print the pattern off on a sheet of regular letter-size paper, and cut out the shapes.
  2. Lay out the pattern pieces and cut out your felt. (You can also use freezer paper for this step. Trace the shape onto the freezer paper and cut it out with a little extra all the way around, lightly iron the waxy side to your felt, and then cut the pattern and felt at the same time. Peel off the paper to reveal your felt shape.)
  3. Layer your pieces of felt from largest to smallest and stitch them together.
    Two tips: 1.) It helps to leave a little space at the top of the largest piece for attaching your bow and loop later. 2.) I folded the smallest piece over to help hide some of the stitches.
  4. Sew on your pearls as the little mistletoe berries.
  5. Tie your ribbon into a bow and attach just above your pearls. With another piece of ribbon, make a loop to attach to the back for easy hanging.
For more holiday ideas from our favorite belle, Hannah, don't forget to visit her blog Secrets of a Belle.


December 14, 2012

Asheville Pinterest Contest + Giveaway


Explore Asheville is giving away lots of prizes including a vacation to Asheville, NC (one of my most favorite places) via a great Pin-It-to-Win-It contest, and you can find all the details here at Spice Up Your Holidays.

For those of you addicted to Pinterest like me, the rules are simple! Build a holiday board on Pinterest called "Spice Up Your Holidays," and repin the official contest pin plus four others from their board.  Add five more of your own holiday-inspired pins, and then submit the URL via the official entry form here.

The contest runs from now through December 21, so head over to get your official contest pin and get going!


December 12, 2012

This and That and a Few Other Things Too

I have a bit of an attention problem when it comes to crafts.  First I can't focus on anything except trolling my favorite blogs looking for ideas of things to make.  Then I can't decide what to work on first.  After I get started, I inevitably find something new to try, and before I know it, I have a dozen projects in the works.  So here's a sampling of what I've been up to in the last few months -- some are successful finishes (insert pat on the back) and others are still works in progress.

1.  Drawstring project bag for Emily (our sister whose crochet critters have been featured here on the blog)
I've made many of these lined drawstring bags from the pattern created by Jeni of In Color Order.  This bicycle and bunting combo is one of my favorites.


You can see more of these bags that I've made here.


2.  Quilt blocks to contribute to a baby quilt
For this project, I received instructions to use aqua, orange, and pink in blocks for a gender-neutral baby quilt for a member of the Indy Modern Quilt Guild.  The block on the left is what I ended up with after my plan went, well, not wrong, but pretty far off-track from what I originally envisioned.  The block on the right is called Birdbath from Elizabeth Hartman's book The Practical Guide to Patchwork.  I particularly like how the birdbath block turned out, and I'm thinking there may be more of those blocks in my quilting future.


3. Birthday pillow for a friend
A few years ago I made this Friendship Braid quilt as a housewarming gift for a friend.
 

I cut my own 2.5-inch strips for it and still had a lot of them left, so for her birthday this year I decided to make a coordinating pillow.


4.  Baby bibs galore
I've been making lots and lots of baby bibs lately -- like burp cloths, you can't have just one.  Every so often I pick up some new cute flannels and whip up a few more bibs for my gift stash.


5. Felted flowers
I attempted the felted flowers pattern from Aesthetic Nest, and when it turned out well, I just couldn't stop making them.  After felting, I add a pin back to the big flowers.  I think they'd make nice accents on winter coats and bags, so plenty of my friends are getting them as gifts this Christmas.  The small flowers are great tree ornaments, so those may be going out the door as gifts as well.
 
before felting

after felting
 

December 9, 2012

Block of the Month Project: Block #16

Block of the Month: Block 16


This chain block for September forced us to work with curves and lots of smallish pieces. It was pretty intimidating, but with patience (and a lot of pins, at least on my block) we conquered those curves for these cool, modern blocks.  Luckily for us, the same curved blocks appear in Block 17, so watch for an upcoming post on that one.
(P.S. How cute is that Zoey?  Eventually Amanda will catch up on her blocks, but until then Zoey makes a pretty great placeholder in our photo series.)

December 8, 2012

Nativity: 12 Months of Ornaments {December}

December Ornament: Nativity

I decided to let the December ornament be a surprise.  (Turns out it's hard to think up a new theme each month!)  I wasn't sure what to make until I saw this "Stable" pattern from Mollie of Wild Olive.  Mollie provides a PDF with all the pattern pieces; I used freezer paper to temporarily secure them to my felt so that I could more easily cut them out.  A bit of embroidery to secure each piece, and it was pretty much done.

December Ornament: Nativity (back)
Mollie's pattern leaves the back of the stable exposed, but I decided to cover my stitches with another piece of brown felt.  I made this one for my niece Hannah, to mark her first Christmas with the family.  I hope she enjoys putting this one on the tree each year.


December 7, 2012

Block of the Month Project: Block #15

Block of the Month: Block 15
 
 
Surprise!  Mid-August rolled around and Amanda was occupied with preparing for a new arrival, so Caitie and I were left to tackle the remaining blocks on our own.  We have this lovely Double Star to show for our efforts.  Amanda has the adorable Zoey -- I think she wins this one.

Check out our other blocks in the Craftsy Block of the Month series:
Block #1, Block #2, Block #3, Block #4, Block #5, Block #6,
Block #7, Block #8, Block #9, Block #10, Block #11, Block #12,
Block #13, Block #14

December 6, 2012

Block of the Month Project: Block #14

Block of the Month: Block 14

Gosh, I'm definitely behind on posting these blocks.  This Ohio Star was our first block for August.  It's a simple design with a lot of oomph, and I think we were each happy with our results.  Check out those crisp points!

Check out our other blocks in the Craftsy Block of the Month series:
Block #1, Block #2, Block #3, Block #4, Block #5, Block #6
Block #7, Block #8, Block #9, Block #10, Block #11, Block #12,
Block #13

December 4, 2012

November Ornament: Baby Stocking

November: Mom's stocking
 

My mom knitted this teeny little stocking for the November ornament theme -- just a little something she whipped up in between all the wooly socks she knits to send to orphanages overseas.
Jen's intention with this year-long ornament challenge was to create some ornaments that would be toddler-friendly in her home.  This one will be perfect when granddaughter Hannah visits and heads straight for Mom's tree in all her toddler curiosity.

December 2, 2012

Yarn: 12 Months of Ornaments {November Theme}


'Tis a little late to be announcing the November ornament theme, but that's just the way things are right now.  The theme is yarn.  I have a lot of it, and I just can't help myself when I find nice soft yarn in lovely colors, so my stash is destined to continue growing.  But I do use it, so it doesn't just sit around looking pretty (although it does that as well).

This month I made 3 small ornaments.  I used Patons Classic Wool yarn left over from a few other projects and made small felt flowers using this crochet pattern from Aesthetic Nest.  (If you're looking for eye candy, spend some time at Aesthetic Nest -- it's amazing.)  My crochet skills lag far behind my knitting skills, but I took this pattern and some basic crochet instructions on vacation recently, and with a little help from my mom, I was able to conquer both the large and small felt flowers.  These flowers are addictive -- I've made a least a dozen at this point.  I prefer the large flower, which has 3 layers of petals and a more defined shape after it's felted, but the small flower (with 2 layers of petals) makes a great tree ornament ... or three.

November: Yarn

LinkWithin

Related Posts Plugin for WordPress, Blogger...