September 29, 2013

Big Finish: Jungle Patchwork Baby Quilt


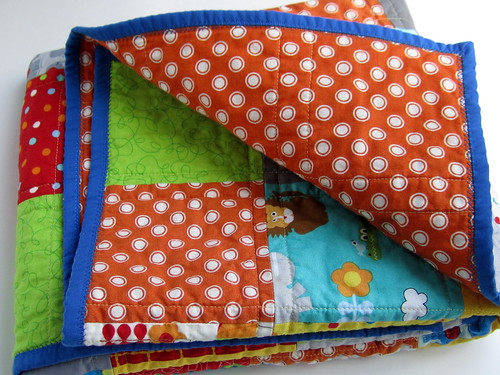
I started this baby quilt with a charm pack (a collection of 5-inch squares) of Moda's Bungle Jungle.  I pulled out some of the squares in the pack because, in my opinion, the fabrics didn't fit well with the jungle animals, and I replaced them with a variety of dots, solids, and a few plaids from my fabric stash. Oh, and that little bunting print, which I love.

I quilted this with yellow thread in straight lines 1/4" from each seam.  The simple grid complements the patchwork squares and keeps the quilt soft enough for a baby. The finished size is 30" x 35".

IMG_2340

This quilt is headed to my good friend's new baby -- littlest brother of the recipients of this quilt I made last year.

IMG_2352

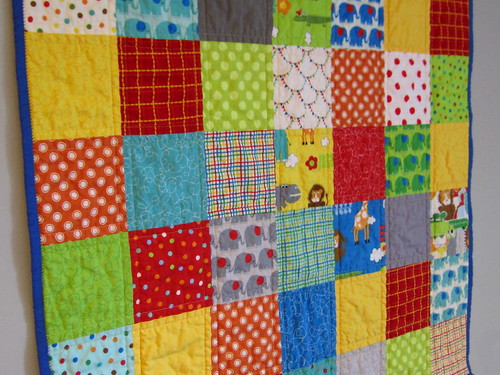
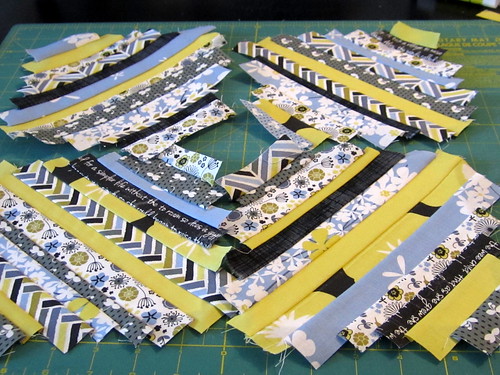
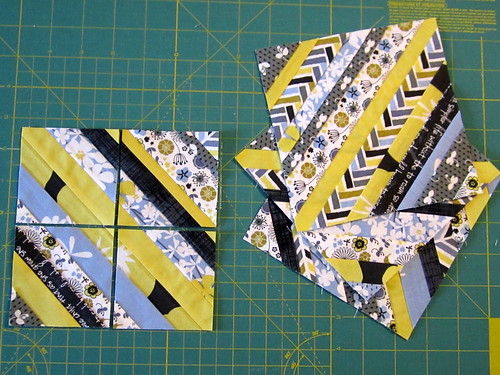
Some friends asked for basic instructions for this type of patchwork baby quilt, so here's how I assembled the top. This patchwork design is very forgiving, so it's a good pattern to start with if you're a new quilter. For a finished quilt that's roughly 30" x 35", start with 56 5-inch squares. Arrange them to your liking in a 7- x 8-square layout, and then start sewing them into rows.  In a row, sew the squares in twos: 1 & 2, 3 & 4, and 5 & 6. Then go back and sew together 2 & 3 and 6 & 7. Finally, sew 4 & 5 together, and you should have a complete row. Press your seams to alternating sides according to the row (for example, the seams in the first row are pressed to the right and in the second row are pressed to the left). After you sew all your squares together into rows, you sew the rows together to build the quilt top. Again, I start with 2-row sections, then put 2 rows with 2 rows, and then 4 with 4. I'm a pinner, so I recommend matching up and pinning the center seam on two rows. Work your way to either end of the rows, pinning at each seam. Your seams that are heading in opposite directions should nestle together at each intersection. Sew slowly and remove the pins as you sew the rows together. If your seams don't match up perfectly, don't fret. That's what makes it handmade.

Jungle Patchwork Baby Quilt

September 22, 2013

Little Paper Pieced Jack O Lantern


Wonky Jack

The quilting gene runs in our family, however I (Jen) am the exception. So, I not only appreciate those who quilt but I love being the beneficiary of quilted gifts and I just received one last week!

Check out the cute, paper-pieced Jack O Lantern wall decoration my mom gave me for the house this fall. I love the different fabrics she used -- especially for the teeth.

This foundation paper pieced Wonky Jack pattern came from Fons & Porter's Love of Quilting Magazine 2004 and there is a $5.99 digital version which includes this pattern as well as others.

It turns out that my sister received her own Wonky Jack from Mom years ago and proceeded to make one for a friend as well.  This pattern is quite easy to follow once you get the hang of foundation paper piecing. There are plenty of great tutorials online for the technique, like this one and this one, and it's nowhere near as difficult as it may seem at first glance.

September 14, 2013

Craft Book Month: Pillow Pop


Hi everyone!  September is Craft Book Month over at Craft Buds, and the 3rd annual celebration has been a blast so far. The idea behind Craft Book Month is to dust off some of those craft books you've collected and actually make something from them (I know, what a novel concept!). I've been following along with all the wonderful bloggers who have posted about their books and projects, and I'm happy to join the party again this year. (You can find all the blogger links at the end of this post, so you can admire their handiwork as well and maybe get inspired to pick up a new book or two.)

This year I decided to request a bunch of craft books from the library and see what jumped out at me. I picked books that I've been seeing and reading a lot about in sewing and quilting circles online, and I was not disappointed! I found a bunch of projects that I'd like to try, and in the end I chose a pillow pattern from Pillow Pop: 25 Quick-Sew Projects to Brighten Your Space by Heather Bostic. The book is a compilation of pillow patterns/projects from a variety of contributors, so a lot of different styles and techniques are represented.


In true indecisive-crafter fashion, I snapped photos of my 4 favorite projects and sent them to my mom so that she could help me decide which one to make. Lucky enough, her first choice was my first choice too! These were my faves --


I made the first one, the Jewel of the Sea, which appears on the cover of the book.  I used Madrona Road fabric that I had on hand from the Modern Quilt Guild challenge that I participated in earlier this year (when I made this quilt). I've kept that quilt to use in my guest room, so a matching pillow just made sense.

IMG_2286

The shattered design looks complicated, but it's simple string blocks that you then slice into 4 smaller blocks. (3 inches! So cute!) A little mixing and switching around, and the center of the pillow is done.

Madrona Road pillow

Madrona Road pillow

Madrona Road pillow

I added yellow and white borders to keep the front light and bright.  The backing is a Silent Cinema print that's a nice shade between gray and blue.

Madrona Road pillow

Madrona Road pillow (and Jack)

I'm really happy with this pillow and think it looks pretty spiffy on my guest bed (the cat likes it too).  I recommend the book Pillow Pop for all the variety it offers -- I still have 3 more favorite pillows to make!

Craft Book Month

It's the 3rd Annual Craft Book Month at Craft Buds! This year, we're excited to celebrate all month log with a blog hop of your inspirational craft book projects, a crafty contest, free patterns and prizes!

Don't let those craft books sit on your shelf and collect dust! We want to see what you've been making. That's why I've teamed up with some fabulous bloggers who will be showing off their projects made from craft books, all month long!

Blog Hop

Week One

Monday 9/2: Fabric Mutt / LRstitched
Tuesday 9/3: Stitch This! The Martingale Blog / Stitched in Color
Wednesday 9/4: Fabric Seeds / Pile O Fabric
Thursday 9/5: The Feisty Redhead / Rae Gun Ramblings
Friday 9/6: Sew-Fantastic / Clover + Violet
Saturday 9/7: A Prairie Sunrise / Small Town Stitcher

Week Two

Monday 9/9: Hopeful Threads / Go To Sew
Tuesday 9/10: The Sewing Rabbit / Sewing Mama RaeAnna
Wednesday 9/11: Marci Girl Designs / imagine gnats
Thursday 9/12: Sew Sweetness / amylouwhosews
Friday 9/13: Lindsay Sews / 13 Spools
Saturday 9/14: Inspire Me Grey / Angela Yosten 

Week Three
Monday 9/16: Sew Very / Craftside
Tuesday 9/17: The Littlest Thistle / CraftFoxes

9/1-9/30: Link up your craft book project at Craft Buds from your blog or Flickr account, and enter to win prizes. Winners will be announced on Tuesday, October, 1!


2012 Craft Book Month Projects (L to R):

Sew Crafty Jess, Sewing Rabbit, Stitched in Color, MissKnitta's Studio

To participate in the month-long contest, just link up any project you've made from a pattern in a craft book. That easy! You'll tell us a little about the book, the project, how you personalized it, etc.

Rules

1) One entry per person. 

2) Your craft book project must have been completed in 2013. 

3) Create a new blog post or Flickr photo (dated September 1, 2013 or later) and link back to Craft Buds/Craft Book Month in your post or photo description. In your post or photo description, make sure to list the craft book you used and provide a link if possible.

4) All winners chosen via Random.org. Some prizes available to international winners, so please join us!

Prizes

Visit Craft Buds and link up your craft book project during the window of Sept 1-30 and you'll automatically be entered to win some fantastic prizes from the Craft Book Month sponsors!

No time to make a project? You can also follow Craft Buds all month long for your chance to comment and win some new sewing and quilting books for your library.


 Craft Book Month at Craft Buds

September 5, 2013

DIY Decorative Wall Letters

If you're like me, you may be a little suspicious of some of the Pinterest ideas out there. I admit I've looked at a few of the "Pinterest Fail" sites and laughed hysterically at beautifully styled photos next to the disastrous messes those projects became when a real-life person followed directions. Well, I don't have one of those stories to tell here. Today, I share with you a Pinterest success ... Decorative Wall Letters.

Inspirational photo from Pinterest:
Image: TopShelfLetters@Etsy

My version:
The original wall letters on canvas came from an Etsy site where they're listed as sold out (so I wasn't the only one that thought they were cute).  I decided to modify the idea a bit, and here are some notes on how I made this project my own:
  • The inspiration letters use scrapbook paper and Modge Podge, and I don't like Modge Podge. It's messy and I'm always left with a half-used bottle sitting about, so I chose to use fabric stapled on the stretched canvas instead. It worked!
  • I also purchased the letters. There is no jigsaw time in my life and I will happily pay for letters to save time. With a 2 1/2-year-old, my DIY threshold dictates that the project must be completed within the span of 2 naptimes or it just won't ever get done. 
  • I used hot glue to glue the letters to the fabric.
What you'll need to DIY:
Fabric (pre-cut fat quarters work if you use a 12"x12"canvas)
Pre-finished letters
Hot glue gun
Upholstery staple sun
Ribbon

Steps:
1. Get yourself organized. It took me 2 naptimes to rock out 6 letters.


2. Iron your fabric and lay it face down on your work surface. Lay the canvas face down on the wrong side of the fabric. Use the stapler to attach the fabric to the wooden frame of the canvas, folding the fabric in at the corners as neatly and as flat as you can get it.


3. Measure and cut the ribbon for each of the canvases. Attach the ribbon to the canvas using the staple gun.


4. Attach the wooden letters with a hot glue gun (this should work whether your letters are wooden or paper). Let them dry for a few hours before hanging to make sure they're secure.


5. I hung the letters using a simple carpentry nail, but you could also use no-mark hangers. I played with the ribbon a bit to cover the nail; you could hot glue a cute button or knob to the end of the nail if you want to embellish it.

Ta-da!  These letters on canvas are a great way to incorporate coordinating fabrics into a bedroom, no matter what age your kiddo may be.


September 3, 2013

Vacation Stitching

In preparation for a vacation in August, I was looking for a hand-stitching project to take on the plane and work on during downtime at the beach. I found something to work on, but one project quickly became three...


First, a needle book. This one from Sew She Sews is like a needle book on steroids, finishing at 5" x 6.5" closed. The size isn't a bad thing, just something to consider if you're looking for a needle case that's small and sweet. I followed this tutorial.


Second, a zippered bag to store my project and new needle book. I returned to this tutorial from Flossie Teacakes, which I've used before, and enlarged the dimensions to finish at 10" x 11".

Third, the project itself. I wanted to do English paper piecing (basting over a paper foundation to hold and support the fabric pieces while sewing them together), and I've already made hexagons, the go-to EPP project. I wanted to try a different design. A search on Google Images led me to the Spring Carnival pillow by I'm A Ginger Monkey. This is a cool design with lots of possibilities depending on fabric placement. I decided to make mine like the pillow linked above, using a charm pack I've had forever of the "Oz" collection by Sanae for Moda. I cut many, many shapes from cardstock and just as many fabric pieces to go with them. The design uses just 3 pieces: the hexagon in the center, small squares, and small triangles.  Here are some shots of my pieces and how they fit together:

IMG_2279

Spring Carnival in progress

One full wheel finishes at around 7.5" across.  I'm not sure what these will become, but I'm just going to see how big it gets before I'm bored with it. For me, this is really more about the process than the end result, and it's nice to have a small, portable project to pick up now and then.

LinkWithin

Related Posts Plugin for WordPress, Blogger...